


The Open Sanctuary Project is proud to present the Sanctuary Resident Record Keeper system completely free of charge. This system utilizes Google Drive, Google Forms, Google Docs, and the free plugin Form Publisher. Google accounts are free (if you have a Gmail account or if your organization’s email is managed by Google, you already have access to all of these tools!) Form Publisher is free as long as you don’t plan on generating more than 100 reports a month- if you don’t want this restriction, it’s $42 for unlimited reports. If you’re a registered non-profit, Google provides G-Suite free of charge, an excellent value that only adds more utility to the flexible Sanctuary Resident Record Keeper system.
Why Is Record Keeping Important?
Check out our article on just that subject matter!
Introduction Video
Easy Setup Video Guide
What Does The System Do?
This system allows you to create ongoing, safely kept logs of anything that might happen on your sanctuary and with the health and safety of your sanctuary’s residents. It includes forms for tracking individual resident health checkups, vet visits, intakes, quarantine, and more! By following the one-time setup procedure with your Google account, the system will keep records for your sanctuary and residents that are safely stored in your private account’s cloud. The system will also generate customizable and clean PDF reports that are automatically emailed to whoever you specify.
By virtue of the setup process below, all forms and templates will be completely yours to use and customize to your specific needs. The Open Sanctuary Project will never have any access to your submitted forms or records as it will be deployed as a completely new copy on your own Google Drive.
As configured, the forms are equipped to accept photos and most other media. Photos can be embedded in the emailed PDF reports, and all media will be safely uploaded to your Google Drive, provided you have the storage space (all free accounts come with 5 gigabytes of storage).
Best of all, these forms can be submitted both via computer or smartphone (internet access permitting)- imagine being able to quickly conduct a health check while inputting remarks, then snapping a picture of a notable concern and your veterinarian’s report and having it immediately timestamped, backed up and sent to you and your team for safe keeping!
Getting Started
Get The Form Templates That You Want
If you don’t already have a Google account, you can create a new one here. Assuming you already have a Google account, all you need to do to get started is click on the following links to create new copies of whichever templates you find valuable for your record keeping. Make sure to create a copy of both the “Form Template” and “Form Publisher Template”, which will be important for creating the PDF record. When you create a copy, it will be saved in your Google Drive folder and yours to keep, move and rename if desired, and customize.
All forms are Revision 1.0 unless otherwise noted
Chicken Health Checkup Form Template
Chicken Health Checkup Form Publisher Template
Cow Health Checkup Form Template
Cow Health Checkup Form Publisher Template
Duck Health Checkup Form Template
Duck Health Checkup Form Publisher Template
Goat Health Checkup Form Template
Goat Health Checkup Form Publisher Template
Horse Health Checkup Form Template
Horse Health Checkup Form Publisher Template
Llama Health Checkup Form Template
Llama Health Checkup Form Publisher Template
Pig Health Checkup Form Template
Pig Health Checkup Form Publisher Template
Sheep Health Checkup Form Template
Sheep Health Checkup Form Publisher Template
Turkey Health Checkup Form Template
Turkey Health Checkup Form Publisher Template
All forms are Revision 1.0 unless otherwise noted
Sanctuary Resident Intake Form Template
Sanctuary Resident Intake Form Publisher Template
The Sanctuary Resident Intake Form is intended for logging all information and paperwork when you receive a new resident.
Sanctuary Resident Profile Form Template
Sanctuary Resident Profile Form Publisher Template
The Sanctuary Resident Profile Form is intended for creating a quick profile about your sanctuary’s individual residents, their story, and any special care notes.
Sanctuary Resident Quarantine Form Template
Sanctuary Resident Quarantine Form Publisher Template
The Sanctuary Resident Quarantine Form is intended for logging quarantine care for your sanctuary’s residents.
Sanctuary Resident Ongoing Care Form Template
Sanctuary Resident Ongoing Care Form Publisher Template
The Sanctuary Resident Ongoing Care Form is intended for logging ongoing care events such as hoof and toe trimming.
Sanctuary Resident Veterinarian Visit Form Template
Sanctuary Resident Veterinarian Visit Form Publisher Template
The Sanctuary Resident Veterinarian Visit Form is intended for logging veterinarian visits, the reason why, procedures conducted, medication prescribed, care notes, and logging paperwork.
Sanctuary Resident Intensive Care Form Template
Sanctuary Resident Intensive Care Form Publisher Template
The Sanctuary Resident Intensive Care Form is intended for logging intensive care plans when a resident needs special treatment and for keeping track of the treatment progress.
Sanctuary Resident Incident Form Template
Sanctuary Resident Incident Form Publisher Template
The Sanctuary Resident Incident Form is intended for logging incidents between residents, or between residents and humans and keeping track of any paperwork or reports.
Sanctuary Resident End Of Care Form Template
Sanctuary Resident End Of Care Form Publisher Template
The Sanctuary Resident End Of Care Form is intended for logging all information when a resident leaves your care or passes away.
Restore The Missing Files Upload Folder
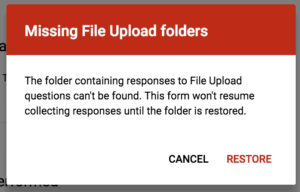
The first thing that will pop up when you create a copy of the Form Template is a message reading “Restore Missing Files Upload Folder”. All you need to do is click “restore” and it will create a new folder on your Google Drive where all the uploaded form submission media will be backed up to. You can move this folder within your drive and rename it as desired. You’ll have to do this for each Form Template you use, but it’s pretty straightforward.
Set Up Form Publisher
Installation
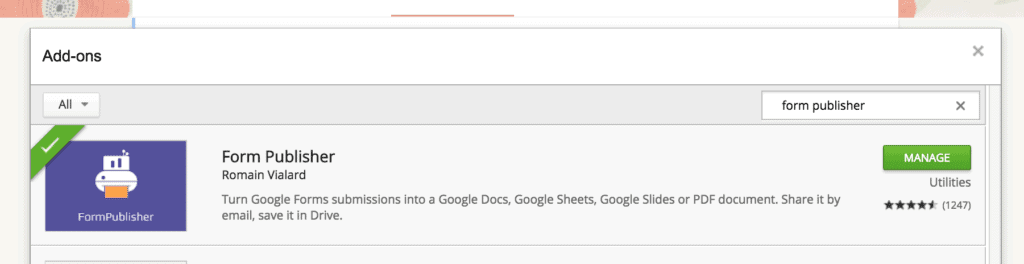
You’ll want to install the Form Publisher plugin, which is used for creating Google Docs and PDFs of your form submissions. By default, submissions can be sent to a Google Spreadsheet (similar to Excel), but we’ve found that Form Publisher is an invaluable addition to our Record Keeper. Click on the puzzle piece button on the top of the document and click on “Form Publisher”, then it will take you to the Chrome add-on store. It’s free to install, just click the “Free” button.
Once you’ve installed Form Publisher, it will work for every template in this system.
Link The Associated Form Publisher Template And Insert Media
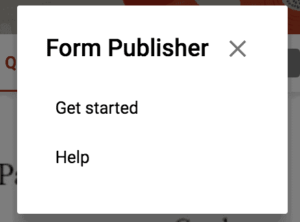
Now, click on the puzzle piece again, and Form Publisher, and there will be a “Get Started” button. It will bring up a new window asking whether you’d like to turn your form submission into a Doc, a Sheet, or a Slide. Below that, there’s the button “I have my own template”, which you’ll want to click if you want the easiest set up. If you haven’t yet, make sure to create a copy of the Form Publisher Template document accompanying the Form Template. Then use the Google Picker after clicking “I have my own template” to choose that Form Publisher Template document in your Google Drive.
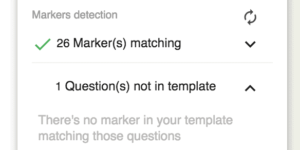
Form Publisher will show you the selected Template as well as “Markers detection” (it should have all Markers matching). If you haven’t altered the form, everything will match automatically.
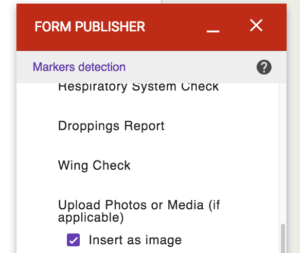
If this section lists any “Question(s) not in template”, see Troubleshooting below.
Then you can click “NEXT” on the bottom of the Form Publisher popup.
Destination Folder & Naming
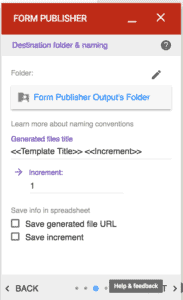
Here you’ll say where you want the saved Google Doc and PDFs of your reports will live for this form. It will default to “Form Publisher Output’s Folder”, but you can click on that and rename and move it to anywhere in your Google Drive.
The generated files title uses the same <<>> variables as the form templates. It defaults as <<Template Title>><<Increment>>, where Title refers to what you’ve named the Form Publisher Template google doc and <<Increment>> is a counter that automatically goes up with each submission. You can change this title generation with any variable you’re asking for in the Form, as well as variables like <<Date>> and <<Timestamp>>. If you want a permanent part of the title, you can just add that without the <<>> marks. For instance, if you know this form will only be used for Lulu the chicken, you can setup the generated files title as “Lulu Health Checkup on <<Date>>”.
If you’re using a spreadsheet as well, you can have Form Publisher generate the URL and increment into that document for easy reference. Then click “NEXT” and it’s onto the last option!
Sharing Options & Notifications
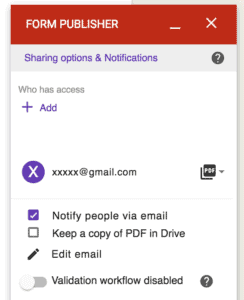
Here you’ll say exactly who gets emailed and what they get after you complete the form. We recommend listing the email of the primary caregivers of your sanctuary and making sure they get a PDF. You can list as many emails as you like. We recommend also notifying people by email and keeping a copy of the PDF in Drive. This way, the reports will be saved in multiple locations and less likely to get lost. You don’t need to use the validation workflow. Then all you have to do is click “DONE” and you’re all set up with this template! No need to click “TRY IT” unless you want to see what happens when you create a test submission!
Creating the Form Submission Links
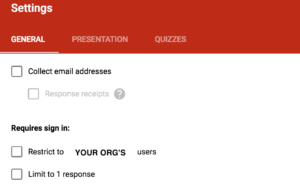
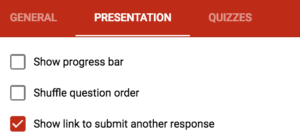
In order to actually use the forms in the field, you need to use the “sharing link” rather than the “editing link” (the link used to actually change what the form is asking for). To get this link, first go to General in Settings on the form. Ensure that you have the permissions you’d like to grant on the form. Do you want it to only be usable if the submitter has a login for your nonprofit’s G-Suite? Then you can click “Restrict to X Users”. You shouldn’t click “Limit to 1 response” as you want people to submit multiple forms. Next, under Presentation in Settings, it’s helpful to enable the “Show link to submit another response” option, especially for health checkup forms if you have a large flock or herd.
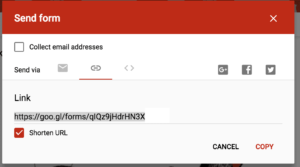
Once you’ve verified these options, click on the big “SEND” button up top. Navigate over to the “chain” icon under “Send Via”. Copy the link and paste it into an email or accessible website or google doc for access to authorized record submitters in your sanctuary. You’ll have to generate a unique link for each form that you use in your organization, but you’ll be able to submit as many records as you’d like with the link you generate. We suggest maintaining a private web page that has submission links to each kind of form for easy access on smartphones.
All Set!
Once you’ve set up the Sanctuary Resident Record Keeping system for your sanctuary, you’re ready to start keeping uniform, safely backed up records for all of your sanctuary’s residents and life at your organization! All forms and publisher templates are free for you to modify for your purposes! Just make sure to update your Form Publisher Templates if you change any questions or wording in order to continue capturing the data you want!
Advanced Options & Troubleshooting
Troubleshooting Questions Not In Template
If you’ve changed the wording of any question on the form or added additional questions, it will say “Question(s) not in template. If you click this, it will show you which questions are not going to be properly documented in your reports. You can fix this by clicking on the blue template listed and editing the Google Doc. The way that the template works is it gathers all answers and fills them in the report between the following marks: <<>>

For example, if you’d like to add the question “Form Submitter Email?” and you want to include this information in the resultant report, if you add the variable written as: <<Form Submitter Email?>> (paying special mind to any characters and spacing), it will put that form information there in the report. It will place the answer anywhere where you put that variable. Make sure to contextualize it in your report with a description! Take a look at the Form Publisher templates if this is unclear; the function and formatting will be apparent.
Editing Form Publisher Templates

If you want to customize the look and verbiage of your reports (or what you want to be reported), you can just edit the Google Docs of each Form Publisher Template. As long as you don’t change the <<>> variables, you can move them wherever you’d like on the document, change font and size, as well as permanent descriptions.
Creating An Automated Spreadsheet Output In Addition
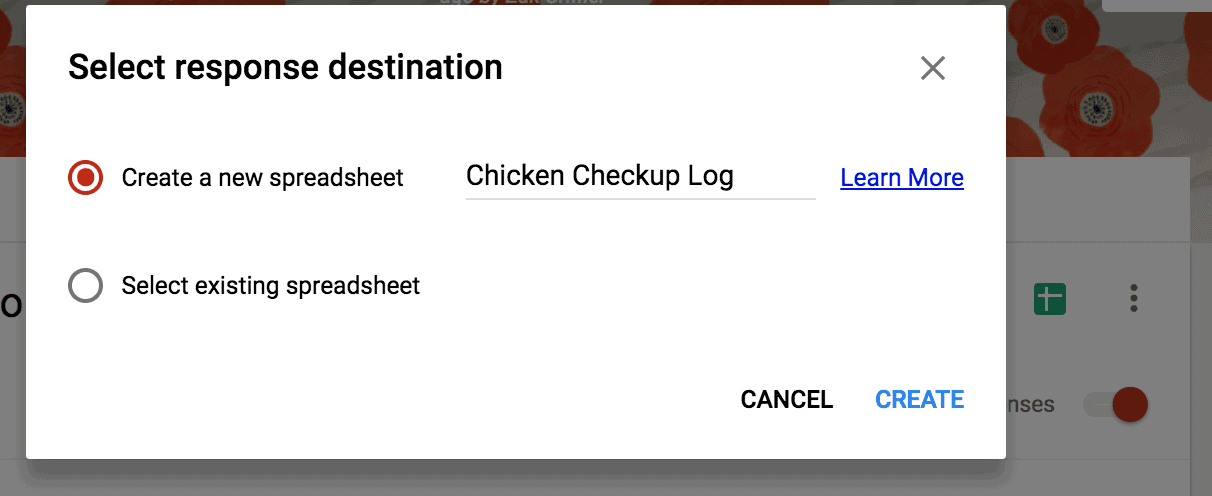
If you’d also like your form submissions to be logged into a spreadsheet, switch over to the “Responses” tab of the form (it defaults onto the “Questions” tab) and click the green spreadsheet square. There, you can create a new linked spreadsheet that will keep tabs on every submission of the form in your Google Drive so you can easily compare data submissions between each other and have a register of forms submitted.