Veterinary Review Initiative This resource has been reviewed for accuracy and clarity by a qualified Doctor of Veterinary Medicine with farmed animal sanctuary experience as of February 2020.
If you’re caring for chickens in a sanctuary environment who were bred for their eggs, you are likely aware that their volume of egg production is not natural, and that egg laying itself is not harmless. It is an incredibly taxing process on chickens’ bodies, requiring a large amount of nutrition as well as contributing to a number of reproductive health issues, most of which are fatal. Although there are some things you can do about egg-laying at a sanctuary, if you have the resources and opportunity, one possibility is to give hens regular Suprelorin F implants. Not only can implantation give hens a break from the taxing cycle of egg-production, but it can also give them an opportunity to heal from health challenges exacerbated by frequent laying and, anecdotally, has been reported to help chickens live a much longer, healthier life than their non-implanted peers.
In addition to helping “laying” chickens, implantation can be a valuable healthcare tool for large breed chickens, sparing their more fragile bodies from the additional health challenges of laying.
Legal Disclaimer
In the United States, using Suprelorin implants to treat chickens is prohibited by the FDA. As always, please remember that all information published by The Open Sanctuary Project is provided for informational purposes only- we do not provide legal or medical advice, and should not be considered an alternative to licensed veterinary or legal consultation. While we believe that sanctuary bird residents are no different than other species typically considered “companion animals,” and do not advocate for their exploitation or use in any manner, the FDA considers chickens and many other species commonly cared for at farmed animal sanctuaries to be “food animals” or “food producing species.” These labels are not only frustrating to see applied to the individuals we advocate for, but they also limit the treatment options available to many species of farmed animals in the United States.
What Is Suprelorin?
Suprelorin is a brand name implantation system for deslorelin acetate. Administered under the skin, this rice grain-sized implantation prevents specific hormones from being released in a hen’s body, which prevents eggs from being produced. It is similar in function and concept to a human’s implant-style birth control system. Suprelorin can be obtained in both 4.7mg and 9.4mg dosages, though availability varies. Unlike in the species that it is labeled for, the suppression of reproduction in avian species is extremely variable. Many research studies have been performed to assess this topic, but the results are inconsistent. Zoos and research facilities can legally use Suprelorin in avian species, and most of the guidelines we see for chickens are derived from this usage. Duration of effectiveness has been reported anywhere from 2 weeks to 2 years in the galliform species; implant effectiveness and duration is highly variable depending on the individual chicken. You should work closely with a veterinarian who has experience with these implants to develop a specific protocol for your avian residents which will take into account their ages, species, environment, and current reproductive health.
Is Implanting Ethical?
Some caregivers have expressed concern that suppressing a chicken’s reproductive system is not fair to chickens, or is further manipulation of their bodies. As a counterpoint to this, some respond that “layer” chickens did not have any say in having their bodies produce far too many eggs than what is “natural” or safe for their bodies. Just as spaying and neutering has immense health benefits for some species and should typically be part of a sanctuary’s care policies, anecdotal information suggests that implanting a bird could potentially give her a greater chance of a happier, longer, healthier life. Please note that currently there are no studies available on the long-term use of Suprelorin in chickens. Ultimately, the decision to implant residents, either in special cases or as a matter of policy, is up to an individual sanctuary’s Philosophy of Care and is dependent on having a relationship with a veterinarian who is willing to prescribe the implant.
What Is The Cost Of Implantation?
The procedure’s cost varies dramatically, depending on the strength of the implant, availability of the implants, location of your veterinarian, and individual veterinary practices’ pricing decisions. One implant could cost anywhere from $90 (around the cost of the implant from the distributor) to upwards of $600. Due to the need for repeated implantations and the number of chickens a sanctuary may have rescued, this may prove cost prohibitive and some sanctuaries only implant birds who are at higher risk of mortality due to illness or reproductive system complications.
Because reproductive health is an important (and often costly) aspect of animal health care, The Microsanctuary Resource Center offers a grant for qualified organizations looking for financial support in this area.
Although the cost may seem high, if implantation is an available option, one might weigh Suprelorin’s price against the cost of emergency veterinary treatment due to reproductive system illness that could potentially be prevented by implants.
The implant is typically administered by a veterinarian using a needle in a similar process to microchipping a cat or dog. Topical anesthetic can be implemented in the area of the implantation, but total sedation is an unnecessary risk for this procedure. Before implantation, the area should be aseptically prepared using dilute cholorhexidine solution or a very dilute betadine solution. Suprelorin is implanted subcutaneously between the shoulders at the base of the back of their neck. Though some veterinarians may suggest placing the implant subcutaneously in the breast area, this technique comes with an increased risk of complications and is not advised. Once the implant is injected under the skin, the small opening remaining after implantation should be either sealed with a tissue adhesive or sutured shut to prevent the risk of the implant falling out. Other than the need to keep the bird calm and still, it should be a relatively quick and painless procedure.
Complications Of Off-Label Use
Because bird implantation is not an official use of Suprelorin, it is up to individual veterinarians whether they wish to administer the treatment. Some veterinarians have refused to administer Suprelorin to birds, unless using it as an experimental treatment for an existing health condition with few other treatment options. Others may refuse outright to treat any birds with Suprelorin.
Can Someone Other Than A Veterinarian Administer Suprelorin?
Qualified caregivers can work with an experienced veterinarian to learn how to properly administer Suprelorin, but this undertaking should not be treated lightly. Improper administration can have grave consequences. However, sanctuaries that have a qualified caregiver and also have a veterinarian who is willing to dispense the implant may choose to administer Suprelorin themselves in order to cut down on costs and eliminate the need to transport the bird to the veterinarian. This setup is especially helpful for chickens who were previously implanted by a veterinarian but need subsequent implantation. Since prescribing the implant for use in chickens carries potential legal risk in the United States, not all veterinarians are willing to dispense Suprelorin for caregivers to administer themselves.
What Can I Expect From An Implanted Hen?
The first time a hen is implanted, you should expect a rather dramatic molt a few weeks after implantation (though this is not necessarily guaranteed). You should anticipate a decrease in egg laying within a few weeks if the chicken responds positively to the implant, though some see a change within a few days. Subsequent injections will result in less serious molts, and anecdotally, it seems they may also take effect more quickly. Many have reported that implanted chickens tend to regrow much healthier feathers, likely due to decreased nutritional taxation from egg production. If the chicken is molting in the wintertime, ensure that they are given a warm enough environment!
Their comb and wattle will become pale and shrink, and their beak and face will also appear paler as well. It is important that during this time you monitor the bird closely and that they are up to date on fecal evaluations as birds can also become pale due to anemia caused by parasites or other disease processes. Their legs will appear to get more yellowish than they were. Their abdomen will appear much more “flat” and less “full” than a laying hen. This will also result in a decrease in weight due to the limited amount of fluid that builds up in their abdomen from less reactive ovaries. It is very important that during this time you are monitoring their weight and body condition in order to confirm that any weight loss that occurs has to do with the implant and that they are not losing important “condition” in their muscles which could indicate a disease process or inadequate nutritional intake. Some have reported a small amount of blood in a recently-implanted chicken’s stool; while this appears to be possibly a benign side-effect of the implant, you should always get bloody stool immediately tested by a veterinarian just to be safe. If the bird becomes lethargic or you notice other drastic changes, consult your veterinarian immediately for further advice.
For the first few months, a chicken may seem more subdued and less motivated by food; this is another reason why it is important to closely monitor the bird’s overall health and to make sure they maintain a healthy body condition. They will eventually perk up, but since they are not spending their calories producing eggs, they will typically eat less food while the implant is working and will tend to spend more time relaxing and enjoying themselves.
There’s a chance that the implant will be completely ineffective, possibly due to it falling out of the bird. In cases like this, consider getting a veterinary evaluation and assessing the implant protocol as soon as possible.
Signs The Implant Is Wearing Off
As previously mentioned, the implant is not a permanent solution; eventually the bird will begin to lay once again over time, but they give ample notice that ovulation is imminent if you pay attention! They will likely become more vocal, possibly more agitated, and both eat and subsequently poop more frequently. A hen with a worn implant may also exhibit “crouching” behavior around humans in the absence of roosters. Their comb and wattle will begin to grow and return to its red color, their legs will begin to revert to their original color, and they will eventually start laying again. If they lay abnormal eggs (thin or soft-shelled, very small, or strangely-shaped), get them evaluated before re-implanting to ensure that they aren’t suffering from a reproductive illness.
If you wish to re-implant the chicken, many individuals choose to slightly overlap the two implant durations if it’s clear that the current implant is starting to wear off rather than waiting for the chicken to regularly begin laying again. While we have not heard reports of adverse reactions from slightly overlapping implants, as of the publishing of this resource, there are no studies available regarding the long-term safety of overlapping implants in chickens.
You do not need to remove the old implant when re-implanting the chicken. The implants do not dissolve, but they do degradate over time making the active ingredient deslorelin ineffective. Some have reported up to 15 continuous implants and counting (without removing the old implants) in a single chicken with continued good health and a high quality of life.
Chickens who are battling serious ailments may not be the best candidates for implantation. This is because it has been reported that the initial effects of the implant might take too much of a toll on an already health-compromised bird for them to handle, and implanting may worsen some tumors. However, chickens suffering from reproductive complications such as oviduct impaction, Egg Yolk Peritonitis, prolapse, or ovarian cancer might have improved health outcomes due to an implant intervention giving their bodies time to recover. While the implant is not a curative treatment, it can be used in conjunction with other treatments to help manage some reproductive diseases.
There have been some reports that a very small number of healthy chickens seem to react poorly to the implant. Others have reported that, in a very small number of chickens, the implant appears to lose its effectiveness over subsequent treatments, so they have decided to reserve implanting only for those who have a drastic need for a break from laying due to health complications.
Can Other Birds Get Implanted?
There have been reports of other laying birds being treated with implants:
Ducks and geese have been implanted, but it appears that the implant lasts for a greatly reduced amount of time, so it may be best to prioritize implants for ducks or geese suffering from a reproductive complication
Ducks, geese, and turkeys appear to require receiving two implants at a time due to their much larger bodies in order for the implant to adequately perform
Some have reported success implanting roosters and drakes to treat acute reproductive illnesses in them, though the implant’s effectiveness in males seems highly variable on an individual basis
Some studies show a positive outcome in reduction of aggressive behavior of roosters following implants
Are There Other Choices Beyond Suprelorin?
Unfortunately, there are currently no known natural remedies to stop egg production. Prior to Suprelorin’s adoption, Depo Lupron was the only treatment to potentially lessen egg production, but this method must be administered monthly in a veterinary office and has been known to cause complications to chickens with weakened livers (especially those who are suffering from the beginnings of FLHS), and has also been known to contribute to osteoporosis when used longterm.
In chickens, like most other species of birds, only the left ovary fully develops and is functional. It is too risky to remove a chicken’s ovary due to its location next to a critical artery; if absolutely necessary, a chicken’s oviduct can be surgically removed. It takes a very skilled surgeon to perform this procedure and even in that case there can be a high rate of chickens who do not survive the surgery or never fully recover. Often, the left ovary will regress after the oviduct is removed. However, in some instances this does not happen, in which case the hen will continue to ovulate and require lifelong Suprelorin implantation to prevent deadly internal laying complications.
Egg Emergency
If a non-implanted hen stops laying any eggs suddenly, this should be considered a health emergency, and they must be seen by your veterinarian. Egg production typically slows down in colder months, but it should never abruptly stop.
It’s always important to understand the challenges the animals in your care face and to learn as much as you can about the medical options available to them. Unfortunately, for the time being much of the information available about Suprelorin use in chickens is in the form of limited studies or anecdotal information. Keep up with us, and we’ll update this resource as new information arises.
If a source includes the (Non-Compassionate Source) tag, it means that we do not endorse that particular source’s views about animals, even if some of their insights are valuable from a care perspective. See a more detailed explanation here.
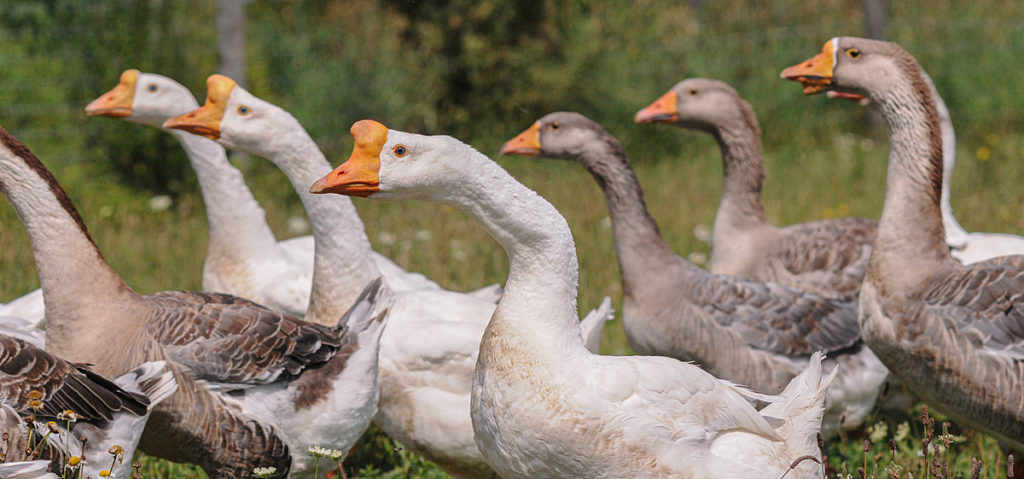
Potential Goose Health Challenges
Photo: Jo-Anne McArthur / We Animals Media
Updated October 31, 2023
This resource is currently being reviewed by a member of our staff. As such, only the conditions that have already been reviewed and updated are available below, and we’ll be adding additional health issues as they are reviewed. Stay tuned- we’ll let you know via social media and our newsletter when updates are complete. If you’re not already signed up for our newsletter, you can sign up below! If you are looking for information about a specific health issue that is not listed below and are wondering when that information might be available, feel free to reach out.
Unfortunately for the humans looking out for them, geese tend to hide signs of illness and injury until they are no longer able to do so. In order to catch and respond to health issues as early as possible, you’ll need to spend a lot of time observing and getting to know your residents so you are better able to catch less obvious signs of concern. By conducting regular full body health evaluations, you’ll be able to know what healthy looks and feels (and smells!) like and when you should be concerned. Check out our guide to goose health checks to familiarize yourself with the signs that something may be amiss with a goose resident. For more information on health challenges that commonly affect goslings, check out our resource here.
Animal Healthcare Disclaimer This is not an exhaustive list of everything that can happen to a goose, but can help you get a sense of what challenges a goose under your care may face in their lifetime. If you believe a goose is facing a health issue, always discuss with a qualified veterinarian as soon as possible. Reading about health issues does not qualify you to diagnose your residents!
The term “angel wing” refers to carpal valgus deformity, a not uncommon condition where a bird’s wing (or wings) droops and then rotates outward. In addition to the term “angel wing,” there are a host of other descriptive terms used to describe this condition including “slipped wing,” “crooked wing,” and “airplane wing.” Primarily affecting growing individuals, angel wing is the result of new feathers developing faster than the musculoskeletal structures necessary to support them. The weight of these new feathers cause the joint to twist. As a result, the affected wing tip(s) is not able to be tucked into a normal position against the body (and when both wings are affected, they may resemble the wings of an airplane or angel, hence some of the common terms for this condition).
While there are a number of factors that may contribute to the development of angel wing, nutritional factors, namely high levels of protein and carbohydrates, are a common cause. Genetics, incubation and hatching issues, as well as restricted exercise may also be contributing factors. When caught very early, angel wing can be corrected, but you should consult with a veterinarian to make sure you are taking appropriate corrective measures (while also addressing the underlying cause, if applicable). While bandages and splints are often used to correct angel wing, it is imperative you are shown how to do this correctly as improper technique can have unintended consequences. If not caught early, before the bones have mineralized, the condition will be permanent. While permanent disfiguration of the wing(s) is detrimental in free-living birds since it prevents them from being able to fly, sanctuary residents can live a happy, healthy life with the condition.
If a resident starts showing signs of angel wing, be sure to consult with your veterinarian immediately, both to determine if the condition is correctable and also to determine the underlying cause. If you welcome a new goose who shows signs of angel wing, consult with your veterinarian to determine if interventions are appropriate or if the condition is permanent. Birds with severe angel wing may need modifications to their living space to prevent them from injuring the affected wing (for example making sure entryways are wide enough for them to fit through without hitting their wing).
Geese can develop various mobility issues, including osteoarthritis (also called degenerative joint disease) and septic arthritis (also called infectious arthritis).
Osteoarthritis– This type of arthritis is often associated with advanced age, though it can also occur in younger individuals as well, especially bigger breeds or individuals who are overweight. Signs of osteoarthritis include abnormal gait, bearing weight unevenly when standing, lameness, and reduced activity. You may be able to hear or feel crepitus (grating or crunching) in the hock (this can be more difficult to feel in the knee and hip). Geese with osteoarthritis may spend more time lying down. Preventative measures include ensuring residents are on a healthy diet (and at a healthy weight) and also ensuring residents have ample opportunities to swim. Treatment with analgesics and creating a living space that is easy for arthritic geese to navigate can help keep residents comfortable.
Septic Arthritis– Septic arthritis is inflammation of the joint(s) due to introduction of an infectious agent, which may result following septicemia or a localized infection of the joint. In some cases, the joint may be red, swollen, hot, and possibly open and oozing. However, in other cases, there may not be obvious outward signs of infection, such as heat or significant swelling, and the individual may look like they have a non-infectious mobility issue. Be sure to work closely with your veterinarian if a resident is showing signs of mobility issues and to discuss the possibility of septic arthritis. While your veterinarian may decide to tap the joint during their physical evaluation, this should not be attempted by anyone other than a veterinary professional- doing so could introduce bacteria into the joint and/or damage the internal structures of the joint, causing further issues. A veterinary diagnosis is imperative. Caregivers sometimes confuse clinical signs of gout with infection, and the two conditions require different treatments, so be sure to work closely with your veterinarian. Septic arthritis can be difficult to treat and typically requires prolonged systemic antibiotic treatment along with analgesics. Regional limb perfusion or the use of antibiotic-soaked gauze or impregnated beads may be recommended to deliver the antibiotics to the infected joint. Septic arthritis can cause permanent joint damage and predispose the individual to degenerative joint disease. Even following resolution of the infection, the individual may continue to have mobility issues and may require ongoing analgesics.
Aspergillosis is a non-contagious fungal disease that typically manifests as respiratory illness in birds. While there are numerous species of Aspergillus, Aspergillus fumigatus, a ubiquitous soil fungus, is the most common cause in chickens, turkeys, ducks, and geese. Aspergillosis is an opportunistic infection – while birds are constantly exposed to fungal spores, often without developing disease, immunosuppression (such as from stress, corticosteroid use, disease, or malnutrition) and being exposed to large numbers of aerosolized spores may result in disease. Poor ventilation, unsanitary conditions, wet bedding, moldy food, and warm, humid conditions increase the risk of aspergillosis. Therefore, you can help protect your residents by properly storing food, keeping living spaces clean and well ventilated, and ensuring spaces do not become warm and humid. Straw bedding can harbor mold and fungus, so wood shavings or other non-straw (and non-hay) bedding is a better option if aspergillosis is a concern.
Aspergillosis typically causes acute signs in young birds (often called “brooder pneumonia”) and a more chronic condition in older birds. Signs of aspergillosis include open-mouth breathing, labored breathing, tail bobbing, gasping, and an elevated respiratory rate. Other signs include inappetence and lethargy. Be sure to contact your veterinarian if you suspect aspergillosis. Diagnosis can be challenging, so be sure to work with your veterinarian to see what diagnostics they recommend. Treatment is also challenging and often requires aggressive and prolonged antifungal treatment (such as with itraconazole) as well as supportive care. In addition to treatment, be sure to take steps to reduce your residents’ exposure to spores by keeping living spaces dry, ensuring food and bedding are not wet or moldy, switching from straw to a safer bedding option, and improving ventilation.
The term “avian influenza” refers to any disease or infection in birds that is caused by Type A influenza viruses. Free-flying aquatic birds (such as migratory waterfowl and shorebirds) are the natural host of Type A influenza viruses, but these viruses can also affect domesticated farmed birds and other bird species. To read more about avian influenza (AI) check out our resource here.
Botulism is more common in waterfowl than other farmed bird species. It is caused by ingestion of neurotoxins produced by the bacteria Clostridium botulinum. While this bacteria is found in the environment without causing issues, under certain conditions the bacteria multiplies and produces toxins. Common sources of these toxins are decaying vegetation and carcasses, as well as maggots feeding on decaying matter. Signs of botulism include progression from weakness to flaccid paralysis of legs, wings, neck, and eyelids. Botulism is sometimes called “limberneck” due to the neck paralysis associated with the disease. The feathers on the neck may also become loose and come out easily. The time between ingestion of the neurotoxin and onset of clinical signs, as well as the severity of those signs, is dependent on the amount of toxin ingested. High doses of toxin can result in clinical signs developing within hours, whereas clinical signs may take a few days to develop if lower doses are ingested. High levels of the toxin are lethal, resulting in respiratory paralysis. Treatment includes prompt administration of antitoxin and supportive care. If botulism is suspected, in addition to seeking urgent veterinary care, it is important to identify the source of the toxin and prevent residents from further access. Prevention includes keeping residents away from decaying foods and carcasses, ensuring they have ready access to fresh food and water, and keeping swimming water safe by aerating small bodies of water and regularly changing swimming water provided in pools or tubs.
Bumblefoot can be caused by many different factors including environmental conditions (such as poor sanitation, rough or hard flooring, or not having water for swimming) or physical conditions (such as obesity or arthritis). Individuals who favor one foot over the other, due to pain or a mechanical leg issue, may develop bumblefoot on their “good” side. Because this foot has to bear more weight, the skin can become damaged over time. Without proper interventions, bumblefoot can progress from a minor issue to something far more severe.
Bumblefoot is typically categorized as mild, moderate, or severe, with severe cases involving infection in the bone (osteomyelitis). The following 1-5 grading system gives a good overview of the progression of this disease and how it affects the overall prognosis, but be aware that your veterinarian may use a different grading system to evaluate and talk about bumblefoot.
Grade 1– At this stage, only the outer skin is affected. It may be very smooth, and it may also be shiny and red, but there is no open wound or sign of infection. With proper interventions, prognosis at this stage is excellent.
Grade 2– At this stage, there is damage to the skin and there may be a scab, callous, or open wound, but the foot will not be obviously swollen. With proper interventions, prognosis at this stage is good.
Grade 3– At this stage, the disease process, and possibly infection, have progressed deeper into the tissues of the foot. The foot will be swollen and painful, and there may be discharge. Prognosis at this stage is good to guarded.
Grade 4– At this stage, the infection has progressed to involve deeper structures within the foot such as tendons and bone. Individuals with this stage of disease may develop tenosynovitis (inflammation of the tendon sheath), arthritis, and/ or osteomyelitis. Prognosis at this stage is guarded to poor.
Grade 5– At this stage, the condition is so severe that it results in debilitating deformity and loss of function. Prognosis at this stage is grave.
It is important to address bumblefoot early before it becomes actively infected and to prevent the introduction of bacteria by keeping the area clean and covered. However, it’s important to note that wrapping webbed feet must be done carefully, so as not to damage the delicate webbing. Depending on the underlying cause, when caught early, foot wraps and changes to the environment may be enough to prevent progression if there is no infection. However, if the primary cause is osteoarthritis in the opposite limb, it can be difficult to fully resolve bumblefoot and have the skin of the foot completely heal.
Be sure to work with a veterinarian if one of your residents has bumblefoot, especially if the affected foot is warmer than normal, painful, or swollen, or if it has discharge, an open wound, or a large scab. Your veterinarian can assess the foot to determine how severe the condition is (which may require x-rays), prescribe appropriate medications, and help create a treatment plan. Depending on the severity, treatment may include systemic antibiotics, analgesics, soaking the foot, various types of foot wraps, delivery of antibiotics directly to the affected area (for example, through the use of antibiotic-impregnated beads), and in some cases, surgical debridement (done by a licensed veterinarian with appropriate analgesics and anesthetics). Keep in mind that the individual’s good foot may be vulnerable to developing bumblefoot if they are especially painful and reluctant to bear weight on the affected foot. Be sure to keep a close eye on the other foot and protect it with a padded bandage as needed.
It is important to work with a veterinarian to determine which structures of the foot are affected, to establish an appropriate treatment plan, and if the treatment involves wound management or wrapping the foot, you must be shown how to do this properly. Left untreated, bumblefoot infections can have devastating consequences.
Duck virus enteritis (DVE) is a contagious and often fatal disease that, despite the name, affects geese and swans, in addition to ducks. DVE is caused by a herpes virus and is sometimes referred to as “Duck Plague.” Unfortunately, most of the available information about DVE is focused on ducks – we were not able to find any veterinary sources that focused on DVE in geese specifically. Even sources that mentioned geese and swans still focused on ducks when discussing details of the disease. Because of this, we’ve included some duck-focused information in order to provide a fuller description of the disease and how it can affect susceptible birds. While ducks, geese, and swans of all ages can become infected, in ducks, mortality rates are typically higher in adults than in ducklings. DVE can be transmitted via direct contact with infected birds or from contact with a contaminated environment. Water can play a significant role in transmission, particularly if residents have access to bodies of water that wild waterfowl also have access to. Clinical signs of disease develop 3-7 days after exposure to the virus and vary depending on many factors, including the age of the individual and the strain of the virus. Though sources we found suggest that clinical signs vary depending on the species affected, when discussing clinical signs of disease, they only discussed ducks. In mature ducks, clinical signs include sensitivity to light (manifested as half-closed eyes), inappetence, extreme thirst, ruffled feathers, droopiness with outstretched wings, sluggishness, ataxia, inability to stand, nasal discharge, watery or bloody diarrhea, and a dirty vent area. In actively laying females, a sharp drop in egg laying may occur. In sick ducks, head, neck, and body tremors may be observed if the individual is forced to move. In some cases, the first sign of disease may be sudden death. Deceased birds may have blood coming from their nares and blood-stained feathers around their vent. Deceased males may have a prolapsed phallus. Signs of DVE in ducklings include dehydration, weight loss, bloody feathers around the vent, a blue color to the bill, and nasal and ocular discharge. Ducklings infected with a low virulent strain often develop secondary bacterial infections with Pasteurella multocida, Riemerella anatipestifer, or E. coli.
Unfortunately, there is no treatment for DVE and birds showing clinical signs of disease often die. Birds who survive can become carriers and shed the virus intermittently. Prevention is key – in addition to following proper intake and quarantine procedures for new residents, avoiding situations where goose residents come into contact (directly or indirectly) with wild waterfowl can reduce their risk of being exposed to DVE. There is a vaccine available to protect against DVE. We suggest talking to your veterinarian about the most appropriate vaccine protocols for your residents. In addition to being used as a preventative measure against DVE, the vaccine can also be used during an outbreak to limit disease spread. Contact your veterinarian immediately if you suspect DVE, and isolate individuals who are showing signs of disease.
A goose who is egg-bound has an egg stuck in her oviduct. Typical signs of egg binding include obvious straining, squatting, standing up oddly tall, open-mouthed breathing (from the pain and stress of pushing), and a lack of appetite, though sometimes the only sign something is wrong is that they are isolating themselves or not quite acting like themself. Egg-binding can lead to cloacal prolapse, a potentially fatal condition. Do not cut the bird to get the egg out, or break the egg. In some instances, holding the goose in a warm bath can help her to pass the egg. However, this doesn’t always work, so watch the goose closely, and if she does not pass the egg while in the bath, or if her symptoms worsen at all, take her to the veterinarian as soon as possible- if left untreated, egg-binding can be fatal. If you suspect a goose is egg-bound but she is not showing any of the more serious symptoms described above, you can place her in an area with a safe heat source such as a heating pad or snuggle safe heat disc- always have a towel or other fabric between the bird and the heat source, make sure the space is set up so that the goose can move away from the heat source if needed, and also make sure that they are well enough to move themselves away from the heat if desired. Talk to your veterinarian about providing an oral vitamin and probiotic supplement made specifically for birds and adding additional oral calcium to their diet during this time. If, over the course of the next 24 hours, the goose has not passed an egg or if she becomes progressively painful, she should be examined by a veterinarian.
Peritonitis is inflammation of the peritoneum (the membrane that lines the abdominal cavity). Egg Yolk Peritonitis (also called EYP or Egg Peritonitis) occurs when there is egg material present in a bird’s abdomen causing the inflammation. Egg material can enter the abdomen in various ways, either from being released from the ovary directly into the abdomen, by being expelled back out of the oviduct for some reason, or from a ruptured oviduct (often due to a severe oviductal impaction). Bacteria quickly grow in the resultant environment. Depending on the underlying cause of the inflammation/infection, it is not uncommon for the bird to make a full recovery with appropriate treatment, especially if there was not an underlying infectious process causing the issue. On a veterinarian’s recommendation, Egg Yolk Peritonitis can be treated with intervention (draining of abdominal fluid), antibiotics, anti-inflammatories, and potentially Suprelorin implantation to give them time to recover, though prognosis is highly dependent on what caused the egg material to end up in their abdomen in the first place. If abdominal fluid is collected, it can be cultured to identify bacterial causes and to determine what drugs the bacteria are susceptible to. It’s a good idea to request a complete blood panel if egg yolk peritonitis is suspected.
Caused by Pasteurella multocida, fowl cholera is a contagious bacterial disease that can affect both wild and domesticated bird species, including turkeys, ducks, geese, and chickens. Fowl cholera typically occurs in late summer, fall, or winter, and can manifest as acute, chronic, or asymptomatic infection. Acute infection is often fatal, and unfortunately, signs of illness usually only manifest a few hours before death. Signs of acute fowl cholera include fever, inappetence, increased respiratory rate, puffy feathers, and oral mucous discharge. Cyanosis is typically seen at the end stages. Individuals will also have diarrhea, which starts out whitish and watery and later contains mucous and turns a greenish color. Individuals who survive an acute infection may remain chronically infected. P. multocida strains with low virulence may cause chronic infection without acute infection. Signs of chronic infection may include swelling of the sinuses, foot pads, along the keel, or in the joints of the wing or legs. If infection in the ear occurs, the individual may develop torticollis (wry neck). Respiratory infection may cause open-mouth breathing and tracheal rales.
P. multocida can be introduced to a flock by an asymptomatic or chronically infected individual, but it’s also possible for wild birds to transmit this infection to sanctuary residents if they are able to come into contact with one another. While some mammalian farmed animal species can be carriers of P. multocida, according to Diseases of Poultry, 13th Edition, these organisms do not typically cause disease in farmed bird species, with the exception of P. multocida from pigs.
Infected individuals spread the bacteria in discharge from the eyes, nares, or mouth, which then contaminates the environment as well as food and water sources. The bacteria can also be spread in feces of infected birds. Contact your veterinarian right away if you suspect a resident has fowl cholera. Diagnosis is confirmed with bacterial culture. Your veterinarian can recommend treatment, but successful treatment is dependent on how early and aggressively treatment is initiated and whether or not other infections are present. There are vaccines available, but these do not offer complete protection. Be sure to talk to your veterinarian about whether or not vaccination is recommended and which vaccine is most appropriate. In the environment, the bacteria can be killed by sunlight, heat, drying, and common disinfectants.
Frostbite is a localized injury resulting from freezing and thawing of tissues. In geese who have a knob (prominent bump at the base of their upper bill), this area can be particularly vulnerable to frostbite. The toes are another area that is most commonly affected, though in extreme cases a goose’s entire foot and leg can also be affected. While proper housing and practices that protect residents from freezing temperatures can help prevent frostbite in sanctuary residents, it is not uncommon for farmed animal sanctuaries in colder climates to rescue individuals who are suffering from frostbite. Additionally, certain circumstances may result in a current resident developing a mild case of frostbite, despite a caregiver’s best efforts. An unexpected loss of power or period of unprecedented cold could put residents at risk of frostbite, and certain health challenges could increase an individual’s risk of developing frostbite.
To understand frostbite, it’s helpful to first understand what happens in the avian body as temperatures drop. If environmental temperature drops to the point where a bird is unable to maintain a stable internal body temperature, heat will be conserved in the vital organs, sometimes to the detriment of the extremities. This is achieved through constriction of the blood vessels in the bird’s extremities with regular, intermittent dilation of the blood vessels (known as the hunting reflex) to keep tissue viable. However, if the bird’s body temperature continues to drop, this necessary dilation of blood vessels stops. Both the direct freezing injury and inadequate blood supply (ischemia) result in damage to the tissue, though according to Dr. James Whellehan, DVM, of these, the damage caused by resultant ischemic injury is typically more severe. Frostbite can result in necrosis and loss of portions of the extremities, though it can take weeks for the line of demarcation between viable and necrotic tissue to develop.
If the knob is affected, you’ll notice discoloration in the area (for example, if the knob is normally black, it may turn orange in the frostbitten area). If the toes, feet, or legs are affected, they may initially appear red and swollen, then darken in color to gray, purple, or even black. Depending on the extent of the damage, affected tissue may die, ultimately becoming hard, black, and cold. In some cases, just the outer layers of tissue are affected, but in more advanced cases, the deeper tissues are also affected, in which case loss of portions of the extremity will occur and will not grow back. Preservation of tissue is most likely if frostbite is caught early and treatment is started immediately.
If you suspect a goose has frostbite, be sure to keep them in a warm living space and work closely with your veterinarian. Please note that while it was once recommended to massage the affected area, this is likely to cause further trauma. If an individual developed frostbite at your sanctuary (versus a new rescue who arrives with frostbite), be sure to check others living in the same space and take steps to keep the space warmer, drier, and better ventilated.
Your veterinarian can make specific recommendations for individuals with frostbite depending on the area affected and the suspected extent of the damage (remember, it takes weeks to fully understand the extent of the damage). Frostbite is painful, so at minimum, they will likely prescribe pain medications but may feel additional treatments, such as antibiotics to prevent or manage secondary infection, are necessary. If caught early, before there are obvious signs of necrosis, particularly if toes, feet, or legs are affected, your veterinarian may recommend treatments that can reduce the chances of limb loss. In cases where the extent of the damage is likely to cause loss of portions of extremities, your veterinarian can advise you regarding the best way to support the individual during this process (both in terms of keeping them comfortable and preventing secondary infection). They can also determine if surgical amputation is advised.
Gout is caused by hyperuricemia, an excess of uric acid in the blood, which can develop if a goose produces more uric acid than their kidneys can excrete or if they have kidney issues that impair their ability to excrete uric acid normally. This results in uric acid deposits within the body. There are two forms of gout that affect birds – visceral and articular gout.
Visceral Gout– Geese with visceral gout develop uric acid deposits around their visceral organs. Common areas affected include the liver, spleen, and pericardium. Possible signs of visceral gout include lethargy, poor appetite, weight loss, ruffled feathers, and abnormal droppings. However, individuals with visceral gout may die suddenly without showing obvious clinical signs and a diagnosis of visceral gout may be made during a post-mortem examination.
Articular Gout– Geese with articular gout develop uric acid buildup in their joints, typically in their feet, resulting in soft, painful swelling. Articular gout is sometimes mistaken for bumblefoot, but a key difference is that swelling from articular gout will not be hot. Your veterinarian may take a sample of the material for diagnostic purposes, but you should not attempt to drain affected areas yourself.
Individuals showing any of the signs listed above should be seen by a veterinarian for evaluation. There are a variety of factors that can contribute to the development of gout, including dietary-related issues (ex. prolonged vitamin A deficiency, excess dietary calcium, diets with excessively high levels of protein), infectious diseases that result in kidney damage, and toxins (ex. mycotoxins, certain antibiotics, overdose of insecticides or disinfectants). Your veterinarian can recommend further diagnostics and appropriate treatment which may include fluid therapy, medications to manage hyperuricemia (such as allopurinol and colchicine), and possible dietary changes and/or supplementation (such as with vitamin A). Treatment will depend on the specific situation, so be sure to defer to your veterinarian. In the case of articular gout, your veterinarian may also recommend surgery. This is a painful procedure that can result in profuse bleeding and secondary infection and should only be done by a licensed veterinarian using appropriate anesthetics and analgesics.
Heavy metal toxicosis is one of the most common causes of toxicity in birds. While there are a number of heavy metals that can cause toxicity, birds are most often exposed to heavy metals by ingesting substances that contain lead or zinc. To learn more about how to protect your residents from heavy metal toxicosis, as well as how to recognize signs of toxicity, check out our in-depth, veterinarian-reviewed resource here.
This is a highly contagious viral disease that is a worldwide problem and primarily presents as an acute respiratory disease. Severity of disease is based on many factors including the virulence of the virus. The World Organisation For Animal Health (OIE) describes three forms of the disease: lentogenic (or mild), mesogenic (or moderate), and velogenic (or very virulent). Lentogenic strains, while widespread, cause few disease outbreaks, according to the OIE, and are not reportable. Virulent Newcastle disease (vND, sometimes referred to as Exotic Newcastle disease) is a reportable disease. Infected birds will shed the virus in their respiratory discharges and feces. It can also be present in eggs that are laid by infected birds. Birds may become infected through direct contact with infected birds or by coming into contact with food, water, equipment, or other fomites contaminated with the virus.
Clinical signs typically appear 2-12 days after exposure, with the average being 5 days following exposure. There are different forms of this disease which affect different areas of the bird’s body. Respiratory signs can include coughing, sneezing, gasping for air, and audible and abnormal breathing sounds. Very young birds as well as older birds with a weakened immune system are the most severely affected. Nervous signs may include depression, paralysis, tremors, and circling. In females who are actively laying, they may lay abnormal eggs, lay fewer eggs, or stop laying all together. Typical signs of vND include respiratory illness, watery green diarrhea, depression, and swelling of the tissues of the head and neck.
In addition to the concern regarding how vND would affect your residents if they became infected, is the concern regarding how your residents could be affected by regional efforts to eradicate the disease. During a recent outbreak of vND in California (2018-2020), immediate efforts to contain the disease included quarantining affected areas and compulsory mass killings of birds regardless of whether or not they had actually been infected. After push back from the community, some exemptions were granted for birds who were not showing symptoms of disease so long as their human companion kept them indoors where they could not come into contact with other birds, agreed to regular vND testing, and agreed not to move them out of the area. These exemptions were made on a case-by-case basis, but the important point is that they became available because people advocated for birds who had not been infected to be spared. When faced with a decision that you are uncomfortable with, always reach out to veterinarians or sanctuaries to figure out if there are other options that may be available, and always advocate for your residents. We recommend you pay attention to vND outbreaks and have a plan in place to protect your residents should it be detected in your area. Vaccines are available for this disease but are not typically recommended in a sanctuary and are not guaranteed to prevent infection.
Non-Compassionate Source? If a source includes the (Non-Compassionate Source) tag, it means that we do not endorse that particular source’s views about animals, even if some of their insights are valuable from a care perspective. See a more detailed explanation here.
How to Conduct a Goose Health Check
Photo: Jo-Anne McArthur / We Animals Media
This resource was updated as part of the veterinary review process. It was originally published on August 8, 2018.
Veterinary Review Initiative This resource has been reviewed for accuracy and clarity by a qualified Doctor of Veterinary Medicine with farmed animal sanctuary experience as of June 2023.
Much like the common advice given to humans, it’s important to regularly evaluate the health of geese with a routine health check rather than waiting until a bird is showing signs of distress or illness. Conducting regular health checks will help you get to know what all aspects of a healthy goose look and feel like and will also help you to establish a baseline for what is “normal” for each individual in your care. Not only this, but regular handling may help residents become more comfortable with restraint and human handling. Be prepared to check goose residents over at least every six to eight weeks*! For more information on why regular health checks are important, check out our resource here.
*A Health Check Every Six to Eight Weeks Means Daily Observations! Our recommendation to conduct routine health checks every six to eight weeks must be done in conjunction with daily observations. Caregivers should be trained to observe animals both for behaviors that are abnormal for the species and also behaviors that are abnormal for each individual, keeping in mind issues that are common in a particular species or breed and their warning signs. Thoughtful observation plays a crucial role in catching health issues before they progress into more serious situations. You can read more about daily observation for goose health and well-being here.
Residents With Challenging Backgrounds Close daily observation can be difficult with certain individuals or groups who come from challenging backgrounds. They may be more likely to hide signs of illness or injury, or may not allow you to come close enough to them to thoroughly assess their well-being on a regular basis. Challenging backgrounds may include individuals who are not socialized, have lived feral, or were abused or malnourished. If you care for individuals who came from a challenging background, it is imperative to make time to foster a bond of trust so careful observation is possible. A monthly health check is recommended for these individuals until they exhibit signs that they feel safe and you are confident that close daily observation is possible.
New Resident? Conduct An Intake Evaluation! If you are conducting an initial health evaluation on a new resident, check out our intake evaluation resource to learn about what you should check for and document!
Supplies
Before conducting a health check, it’s helpful to gather any supplies you may need and have them arranged nearby for easy access. Having everything you will likely need nearby can make things go more smoothly and can reduce the amount of time the individual needs to be restrained. If you are performing a health check on someone with a known health issue, you may need to have additional supplies handy, such as those necessary to manage bumblefoot. Otherwise, general supplies to have on hand during goose health check include:
Recordkeeping supplies
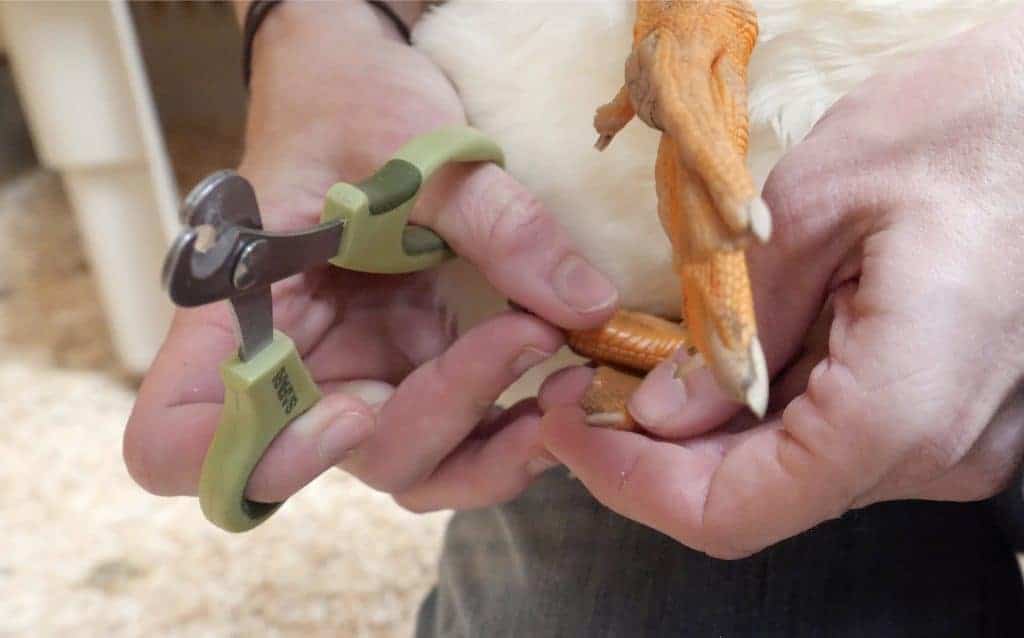
Nail trimmers and/or dremel tool
Styptic powder or other blood stop product
Gauze squares (non-sterile is typically fine, but there may be times when sterile gauze is necessary)
Exam gloves
Bandage scissors
Waterfowl-safe topical disinfectant (such as dilute chlorhexidine or dilute betadine)
Saline flush
Waterfowl-safe ointments or creams such as a triple antibiotic ointment or silver sulfadiazine cream 1% (SSD)
Cotton-tipped applicators
Tweezers
Scale
Headlamp, penlight, or flashlight
Towels
Antiparasitic treatment for external parasites, per your veterinarian’s recommendations
Conducting The Health Check
Ask an Expert Prior to regularly conducting goose health checks, you should have your veterinarian or a compassionate care expert give you hands-on training in order to be the best goose health advocate possible. Being trained to rapidly distinguish abnormalities from normal anatomy and healthy conditions can be crucial in early health problem detection, and the sooner you are able to bring concerns to your veterinarian, the sooner they’ll be able to work towards making a diagnosis and recommending any necessary interventions!
Whenever possible, we recommend performing goose health checks in the morning before residents have had access to pools or ponds. This way, you’ll be able to catch things that may otherwise be cleaned off during the process of swimming or bathing such as fecal matting under the vent or ocular discharge.
Before beginning the actual health check, it’s a good idea to observe the individual without restraining them. Take note of their behavior, activity level, general appearance, how they are standing, and how they are moving. You can read more about “normal” versus potentially concerning goose resident observations here.
During regularly scheduled health checks, your goal is to check every inch of the goose. It’s helpful to have a general order and routine that you follow each time because this can help ensure you do not miss a step. We recommend finding a system and order that works for you. However, because some areas naturally flow into others, it might not be helpful to think of the process as a linear list of areas to check. Instead, we think of it more as a choreographed routine, where checking one area flows into checking another area. By checking individual areas or body parts in you may miss important findings in the gray areas in between.
Throughout the course of the health check, it’s imperative that you monitor how the goose is doing by watching their breathing and that you take a break if someone appears overly stressed.
Safe Restraint Before attempting to conduct a health check, make sure you know how to safely hold a goose. You can read more about safe restraint here. If possible, it can be much easier to conduct the health check with an extra person who can restrain the individual while you perform the health check. This is especially helpful for folks who are just starting out or when working with a resident who is particularly bitey. You must be very cognizant of a goose’s stress levels and breathing when handling them – by having an additional person who can focus on just restraint while you perform the health check, you can ensure that someone is paying close attention to how the individual is doing. If a goose ever seems to be very distressed, breathing heavily (especially open-mouth breathing), or cannot breathe comfortably, you must take a break and let them calm down. Whenever setting a goose down, do so very carefully! Their feet should be solidly on the ground before you let them go.
When In Doubt… Unless you are a qualified veterinarian or have been trained to handle specific conditions, The Open Sanctuary Project strongly advocates that you promptly report any concerns you find during the course of a health check to your veterinarian (if you aren’t sure if what you are seeing is cause for concern or not, a more experienced caregiver may be able to help you, but if you are ever in doubt, we recommend erring on the side of caution and reaching out to your veterinarian). You should be the resident’s advocate, not their doctor! Additionally, routine health checks performed by a caregiver are not meant to be a replacement for a veterinary exam. The goal is to catch potential signs of concern as early as possible so you can bring concerns to your veterinarian. If necessary, they can then perform a more in-depth physical examination of the individual and can conduct diagnostic testing as needed.
Up next, we’ll go over important components of a goose health check:
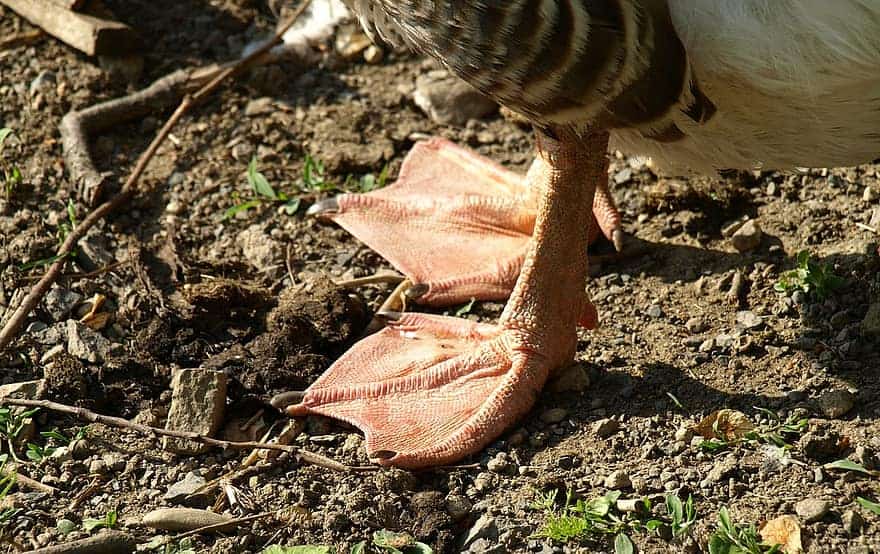
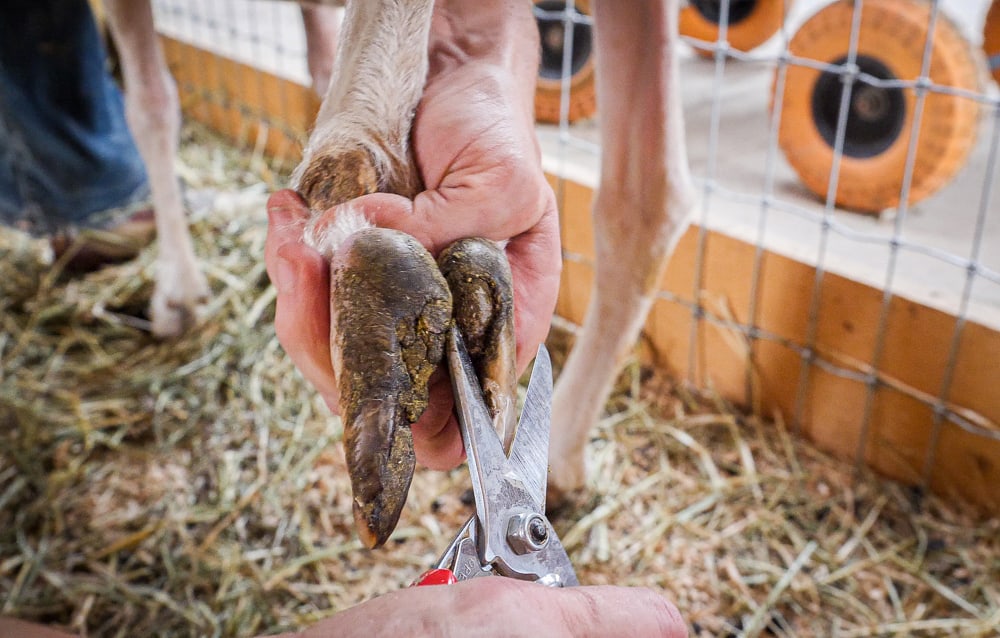
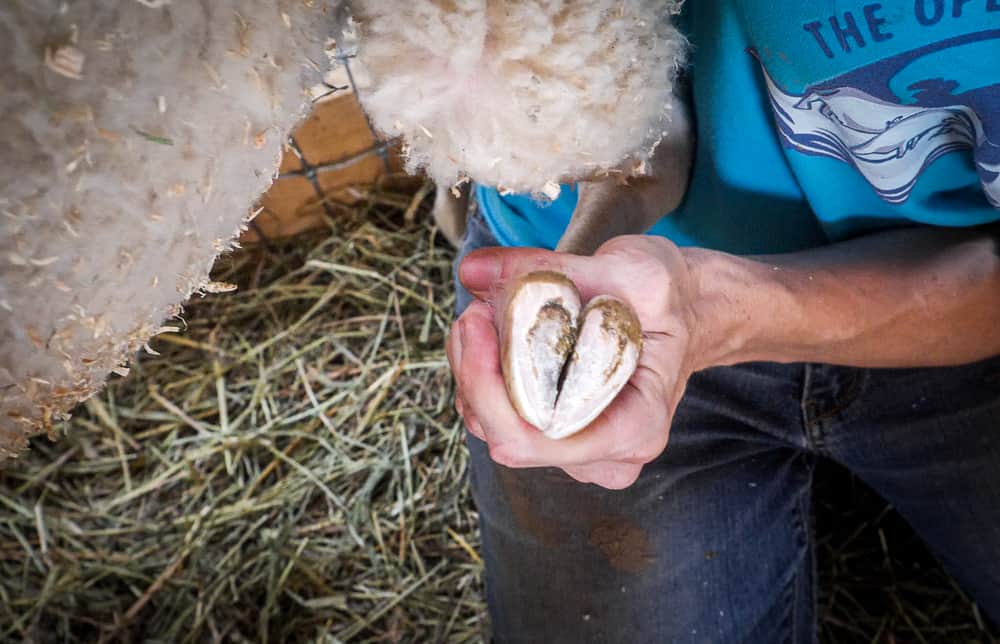
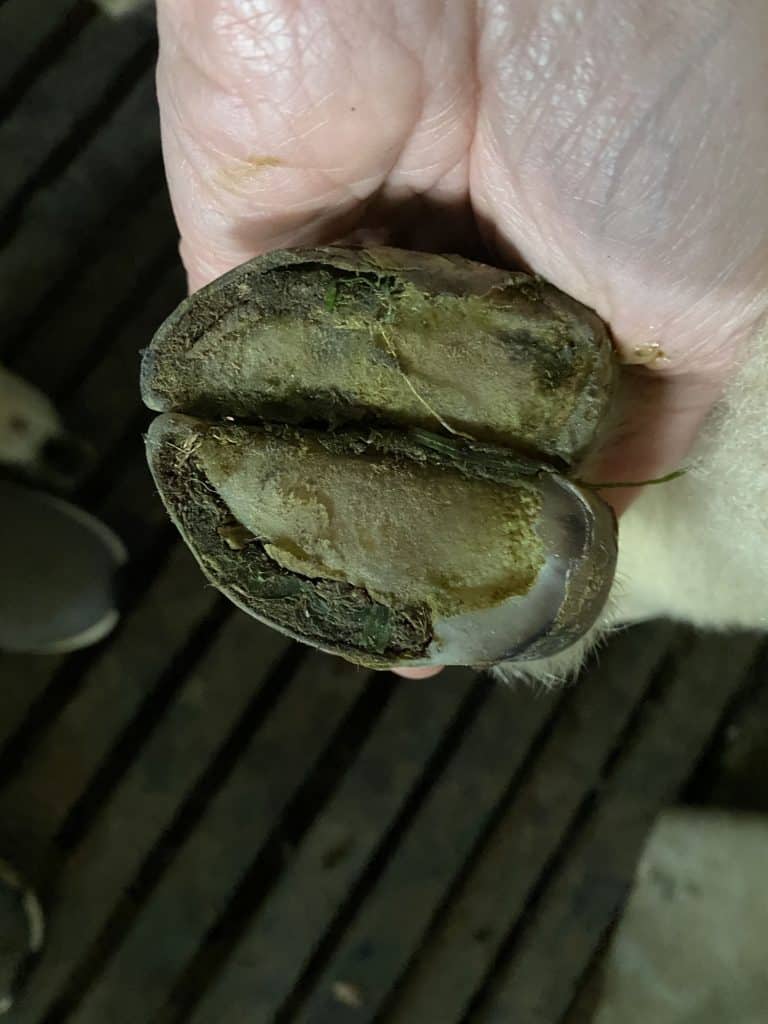
Check Their Feet
A goose should have soft, fairly smooth skin on their feet, and the webbing between their toes should be soft and supple. Toes should be elongated and straight. Check for any bumps, lumps, swelling, heat, scabs, cuts, or pressure sores on both the top and bottom of the goose’s feet and toes. Check the bottom of the foot for signs of bumblefoot which can cause debilitating mobility issues and if left untreated. Early signs of bumblefoot include the skin on the foot pad becoming smooth, shiny, and/or red, so look closely for any of these signs. Individuals with heat, swelling, scabbing, or discharge should be evaluated by a veterinarian.
In cold climates, red and swollen toe tips; stiffened digits that do not bend readily; blackened skin; or hard, black, scabby toe tips/webbing could be a sign of frostbite. If you suspect frostbite, be sure to move the goose into a warmer area and consult with your veterinarian. At the very least, the goose will likely require pain medications, but may need antibiotics or even surgical intervention depending on the extent of the damage. If a goose shows signs of frostbite, be sure to make changes to their living spaces to protect the rest of your residents.
Check their legs for heat, swelling, irritation, injury or other abnormalities. Pay extra attention to their hocks, checking any signs of irritation, which could be the beginning of a pressure sore. Hock sores can start out as reddened skin or superficial scabs and develop into deep wounds that can become infected. Be sure to seek veterinary care if a resident is developing hock sores. While this part of the health check is important for all goose residents, it is especially important for heavier breeds and for geese with mobility issues who may spend more time lying down. These individuals may benefit from more frequent checking of their hocks. Early detection, when skin is irritated but not yet wounded, is imperative because once pressure sores develop, they are difficult to address and can lead to infection. In addition to working with a veterinarian to determine the cause and best course of action to address sores, environmental changes should be made to prevent them from worsening. This includes providing softer, cushioned surfaces and/or adding more bedding to the areas where they spend time lying down.
Carefully check their range of motion, especially in their hocks, and check for crepitus (creaking, cracking, crunching, popping, or grating), pain, resistance, heat, or swelling. Because of the conformation of their legs, checking the range of motion in their knees and hips is more difficult. Stop your evaluation and contact a veterinarian immediately if you feel a large amount of crepitus with pain – this could indicate a fracture and could be made worse with ongoing manipulation. Consult with your veterinarian immediately if one of your residents has hot, swollen, or scabby joints, which could be a sign of infection. Never attempt to drain infected joints!
Check Their Vent
A goose’s vent is the external opening of the cloaca and is where both digestive and urinary waste, as well as eggs are released from a goose’s body. Due to their thick feathering, locating the vent can sometimes be challenging – it is located just below the base of the tail and should appear as a small, tight slit-like opening. The vent should be clean and should be the same color as the surrounding skin. It shouldn’t have any discharge, excessive accumulations of fecal matter around it, nor should it be crusty, bloody, or irritated.
Check for wounds, signs of parasites (including fly eggs, which look like grains of rice), and prolapsed tissue. Be aware that males have a protrusible phallus which projects from the vent when erect. While it is normal for this tissue to extend from the vent on occasion, phallic prolapse is also possible. In addition to the phallus, cloacal, intestinal, and oviductal prolapses are possible. If you see tissue protruding from the vent, it’s good to keep handling to a minimum to avoid causing them to strain and potentially prolapse more tissue. If an individual prolapses a very small amount of tissue while being handled, setting them down may be all that is needed for the prolapse to resolve. If this is not the case, or if there is more than just a very small amount of tissue prolapsed or if the prolapsed tissue appears unhealthy, contact your veterinarian for guidance. Not only can they help with addressing the prolapsed tissue, they can also perform diagnostics to determine the cause of the prolapse. Depending on the type of prolapse and cause, the stress of handling may make things worse. Because of this, it’s safest to use a carrier to move a goose with a prolapse so as to avoid further handling. If a large amount of tissue is prolapsed, KY Jelly can be applied to the tissue to help keep it lubricated and potentially viable while transporting the individual to a veterinarian.
Anyone with feces-covered feathers should be cleaned and monitored. It’s good practice to always evaluate a goose’s abdomen if you find that they have fecal matting under their vent, as this can be the result of a distended abdomen. Be sure to contact your veterinarian if anyone has excessive fecal matting, diarrhea, or is showing other signs of concern.
Check Their Abdomen
For this part of the health check, it’s important to take the goose’s breed as well as their sex and egg-laying status into account, as this will affect the size, appearance, and feel of their abdomen. For example, African geese have a large, round abdomen, and Dewlap Toulouse geese have extra folds of skin (dewlaps) hanging from their abdomen, which is sometimes so large that it nearly touches the ground (particularly in actively laying females)! An abdomen this large may be “normal” for one resident but cause for significant concern in another. It’s important to familiarize yourself with what is normal for each individual, based on their breed, so that you can catch any sign of abdominal distention. Also be aware that in females, the size of their abdomen will change during the year, becoming more distended in the early spring when they begin to lay, and becoming smaller when egg-laying slows down for the season. These nuances can take time to become familiar with, so be sure to take good notes during each health check, and review significant findings with your veterinarian or a compassionate care expert. Regardless of size, a goose’s belly should feel soft. When checking their abdomen, be gentle. There is a chance a female could have a fully shelled egg in their oviduct, and you do not want to break it!
If one of your residents has a distended, fluidy, or hard abdomen, or if you can feel hard structures in the abdomen, the individual should be seen by a veterinarian for evaluation.
Check Their Preen Gland
Above the base of the goose’s tail is the preen gland (also known as the uropygial gland). Orange-tinged oily discharge from the tip of the preen gland and on the feathers of the preen gland is normal. Apart from the lobes of the gland itself, there should not be any additional lumps and the gland should be symmetrical. Inflammation, absence of oily discharge, scabbing, wounds, and other abnormalities in this area should be discussed with your veterinarian.
Check Their Wings
Carefully take a look at the goose’s wings. Exercise caution to avoid the resident getting a wing free and flapping, which could result in injury to themselves and could also injure the human holding them. The wings should be held close to their body, be generally symmetrical, and there should be movement in the wings’ joints when they flex and extend. A droopy wing could be a sign of a fracture or weakness. If the individual’s wing twists outward, this is a condition called angel wing. When caught early, the condition can be corrected, so be sure to consult with your veterinarian if this is a new finding. In cases where the condition cannot be corrected, this twisting of the wing will be their new normal. You’ll want to pay close attention to their wings to ensure they are not damaging them on elements of their living space (such as a doorway that is too narrow).
The goose’s wings should be checked for swelling, heat, abrasions, and other injuries. If their wing tips are scabby or their wing feathers are tattered, this could indicate they have a mobility issue and are using their wings for balance and support. Individuals with mobility issues may benefit from more regular checking of this area to ensure any issues are caught early.
Abrasions on the wings could also be a sign that residents are being injured by elements in their living space such as hardware cloth. Be sure to investigate the cause and make changes to the living space as needed.
Check Their Breast And Keel
Different breeds of geese have different body types, so be sure to consider the individual at all points of the health check, but especially when checking their breast and keel (also called the breastbone or sternum) and assessing their body condition. There should be distinct muscle on either side of the keel bone. A prominent keel is a sign a goose is underweight and a keel that is difficult to feel through muscle and fat could be a sign of obesity. Be aware that some goose breeds have dewlaps hanging from their keel, which should not be confused with excess weight.
Check along the keel for any sores. Keel sores should be treated early on, before they risk infection, and you should investigate the cause (for example, spending more time lying down due to a mobility issue).
Check Their Head And Neck
Neck – Observe the position of their head – any head tilting should be noted. While geese will hold their head in different positions depending on what they are doing, they should be able to hold their neck upright, extending vertically from their body. Drooping could be a sign of illness. Inability to extend the neck normally or the presence of sharp bends or kinks could be a sign of injury. You can feel along the neck, checking for any unusual lumps or lesions. Be aware that some geese have a dewlap that hangs from their lower bill/upper neck.
Unlike galliformes, geese do not have a true crop, though their esophagus can expand to accommodate food intake. Despite this, there have been reports of “crop” issues in waterfowl, so be sure to gently feel around the base of the neck and look for signs of distention in this area.
Eyes – The goose should have wide open, clean, alert eyes and their pupils should be round and symmetrical. The eyes should be clear and free of any discharge or crusts. Be aware that geese have a third eyelid (also known as the nictitating membrane) that lubricates and protects the eye. You will likely see this membrane moving quickly across the eye but it should not be constantly visible. Cloudy, watery, dry, swollen, or crusty eyes are not normal. You should have your veterinarian evaluate any eye abnormalities as soon as possible.
Sinuses – Check the area around the eyes and in front of the eyes for any swelling.
Bill – Check the bill for any injuries or abrasions. If you have more experience with other species of birds, such as chickens, be aware that a goose’s bill is much softer than a chicken’s beak, and can be easily damaged, so use care when evaluating the bill and do not peel or pick at the bill as this can cause injury. Be aware that some geese have a knob where their head and upper bill meet. The knob can be vulnerable to frostbite, so be on the lookout for signs of discoloration or scabbing and connect with your veterinarian if you suspect frostbite. Also be aware that some geese may develop or arrive with a “dropped tongue” and will have a pouch under their lower bill (not to be confused with a dewlap, which is a flap of feathered skin). While this is not typical goose anatomy, and we recommend consulting with your veterinarian if you note this in one of your residents, for some individuals, this pouch will become their “new normal.” We’ll talk a bit more about this condition in the “Check Their Mouth” section below.
Nares – Their breathing should not be labored, loud, wheezy, rattly, whistling, or squeaky. Check their nares for discharge or buildup. In general, if you look into one nare, you should be able to see all the way out the opposite nare. However, the nares can become packed with food, mud, or other matter. If this is an ongoing issue, check that their water is deep enough for them to submerge their head so they can keep their nares clean. If using tweezers to remove something from their nares, use caution not to poke or scratch the bill or the nares. If you notice buildup on the bill around the nares, this could be dried nasal discharge. Do not peel this off as it may result in damage to the sensitive tissue of the bill. If this area needs to be cleaned, opt for a moistened cotton-tipped applicator or soft cloth.
Ears – The ear canal will be hidden by feathers and is located a bit lower and further back on the head than the eyes. The feathers around the ear should be clean and the canal should be free of discharge or debris and should not be inflamed or irritated.
Check Inside Their Mouth
Checking inside their mouth tends to be the goose’s least favorite part of the check, and proper technique can be a tricky thing to learn at first. When first learning this skill, it can be easiest if you have a second person restrain the goose so you can use both hands to open their mouth.
When you look inside their mouth, it should be moist but should not have excessive mucus. Their mouth should not have any ulcers, lesions, or areas of discoloration. Waterfowl naturally have many small bumps (papillae) on the roof of their mouth and along the sides of their tongue but make note of any unusual lumps or obvious asymmetry. Their breath shouldn’t have an overly strong odor – a sour smell could be a sign of sour crop. At the center of the back of their throat is the glottis (the opening to the trachea). If the tongue blocks your view of this area, you can gently push down on the tongue. The glottis should open and close and the goose’s breathing should be quiet.
Be sure to gently check under their tongue for food build-up. Masses of food, particularly long grasses, that become lodged in this area for a prolonged amount of time can cause the skin in this area to stretch, creating a pouch in which food is more likely to become trapped. In extreme cases, the tongue can also fall into this pouch (sometimes referred to as “dropped tongue”), in some cases the tongue can become trapped (submandibular lingual entrapment). Be sure to consult with your veterinarian if a resident arrives with this issue or starts to show signs of it developing. When caught early, repair may be possible, but for residents who have had this issue for some time, this may be an issue that just needs to be managed going forward (which may entail regularly removing built-up food from this pocket).
Check Their Feathers And Skin
For the most part, a healthy goose should have smooth feathers, though there are some exceptions. Some geese have a tuft of upright (or nearly upright) feathers on top of their head, and Sebastopol geese have naturally curly feathers on their body. Goose feathers should repel water, though Sebastopol geese do not shed water as well as other breeds due to their feathering. Feathers that are saturated with water are cause for concern, and unless the individual is molting, feathers shouldn’t be missing or disheveled (though again, Sebastopol geese have naturally curly feathers). If a resident’s feathers don’t seem to be developing or won’t fold into their normal position, this is also indicative of a problem.
In general, feathers should be clean, though you may have residents who have dirty feathers from exploring in the mud or eating a messy treat. Unkempt or tattered feathers could be a sign of stress, external parasites, or unhealthy flock dynamics.
Feathers can hide external parasites, skin issues, and injuries, so it’s important to closely examine each resident’s skin. However, because of their thick feathering, it can be difficult to do this. It may be easiest to check their skin on their legs, along their keel, around the vent, and on the underside of the wings. Skin should be translucent and soft. Make note of any scabbing, swelling, discoloration, or sign of external parasites. Since thoroughly checking their feathered skin can be challenging, it’s often helpful to take time to feel along their entire body, making note of any lumps or changes in texture and then further examining those areas. This is the time to ensure you are checking and feeling every area of the individual’s body, not just those highlighted above. This thorough portion of the health check process is critical to ensure that nothing that can be addressed early is missed.
Check Their Weight And Body Condition
It’s important to have an accurate weight for each of the individuals in your care, and a healthy adult goose should maintain weight consistently. If the goose has lost a lot of weight, this could indicate an illness, malnutrition, or internal parasites – be sure to contact your veterinarian if one of your residents has unexpected weight loss. If the goose has gained weight, it’s critical to ensure that you aren’t overfeeding them (especially with treats) and that you aren’t feeding them an inappropriate diet as obesity can lead to other health issues such as arthritis or bumblefoot.
To weigh goose residents, it can be helpful to use a scale intended for “dynamic weighing” or “weighing in motion”, as these scales will calculate the average weight for an animal moving around on the scale rather than oscillating indefinitely. Baby scales also work well, and most have a “hold” feature that will lock in the weight reading rather than having the displayed weight change as the individual moves. Some caregivers prefer placing residents in a deep basket lined with a towel and using this to weigh them. This works best when using a scale with a large, flat platform so that the basket sits flat. Just be sure to zero out the scale so that it only displays the weight of the goose and not the goose plus the basket. If your scale does not have this capability, you will need to subtract the weight of the basket from the displayed weight to determine how much the resident weighs.
If weighing the goose in a standing or sitting position, make sure they have adequate traction on the scale (a bath mat or rubber bowl can be used to provide traction) and keep your hands near them to prevent them from slipping or jumping off and injuring themselves. We recommend weighing bigger geese and anyone with heart, respiratory, or reproductive issues in a standing or sitting position. Smaller geese may be able to be placed on their side or back – just be sure to watch them closely to ensure they do not have an adverse reaction to being in this position, and keep your hands near them in case they struggle.
In addition to weighing each individual, you should also pay close attention to their body condition to determine if they are at a healthy weight, as described above in the “Checking Their Breast And Keel” section. You might also ask that your veterinarian train you in body condition scoring. Unfortunately, monitoring their weight alone is not a perfect indicator of health. Some health conditions, such as reproductive issues, could result in an individual having a seemingly healthy weight based on the number on the scale, but a check of their body condition may reveal emaciation. Therefore, it’s important to pay attention to both weight and body condition to get a fuller picture.
Check Their Poop
If the individual poops during the health check, be sure to make note of whether or not their stool appears “normal” or potentially concerning. Not every unusual dropping is cause for immediate concern, but be sure to contact your veterinarian right away if anyone has bloody poop; worms in their poop (be aware that the absence of visible worms does not mean the individual does not have parasitic worms or other parasitic infection); consistently foamy, loose or abnormally colored stool that cannot be explained by diet; or if you notice watery poop from an individual who also looks unwell.
When in doubt, grab a fecal sample and connect with your veterinarian.
Isolate If Necessary
If you notice that a goose appears unhealthy, it’s crucial to consult with a veterinarian to accurately diagnose the problem. Depending on the health concern, it may be necessary to isolate the goose in order to protect the rest of the flock from a potentially infectious disease. However, with some illnesses, once a goose is showing symptoms, the other residents in the flock may have already been exposed. In these instances, you will need to weigh what is in the best interest of all of your residents.
A sick goose who is isolated from their flock (and, in particular, their mate) may become more stressed, which could delay recovery. However, if the goose is being bullied or cannot compete with the rest of the flock for food, or if you need to more closely monitor their food and water intake and fecal output, you may need to separate them at least temporarily. You may find that keeping them in a quiet space with their closest companion is a good compromise until they are well enough to rejoin the flock and/or until you’ve gotten the all clear from your veterinarian.
To read more about considering alternative living arrangements in response to a health condition, check out our resource here.
Though it may seem like an overwhelming amount of factors to be aware of, once you’ve gotten to know your goose residents and what good goose health looks like, you’ll be an excellent goose health ally in no time!
Writing It All Down
As you may know, regular documentation is a critical part of responsible sanctuary animal care. In order to maximize the value of your goose health checks, we’ve developed a free printable health check form for sanctuaries and rescues!
Non-Compassionate Source? If a source includes the (Non-Compassionate Source) tag, it means that we do not endorse that particular source’s views about animals, even if some of their insights are valuable from a care perspective. See a more detailed explanation here.
How To Trim a Goose’s Nails
Be sure to keep a close eye on your goose residents’ nail length and trim as needed!
Updated September 8, 2020
Just like the nails on your hands and feet, geese have nails sheathed in keratin on their feet. And just like us, this consistently growing material needs to be maintained for their health. A goose in a sanctuary environment of frequent straw and dirt underfoot may not have enough rough surfaces to naturally wear down their nails, so you should plan to assess their nail length every time you conduct a goose health examination, but only trim their nails when necessary.
Signs You Should Step In
You should schedule a trimming if a goose’s toenails grow to the length where they begin to grow far past their feet, become dangerously sharp, begin to curl, or become ingrown (sometimes in circumstances where they don’t have enough hard surfaces to scratch against, sometimes by virtue of their genetics).
Pre-Trimming Suggestions
Carefully corral and pick up the goose. If they’re too stressed to be held, you must set them down and give them time to calm down before trying again. This process may be aided with a second set of helping hands holding the goose if you or the bird are nervous!
How To Trim A Goose’s Nails
Take your time and only trim a little bit as you go!
Trimming a goose’s nails is very similar to trimming a cat’s or dog’s nails. Like cats and dogs, geese also have a sensitive area made of soft tissue in the center of their claws known as the quick. Unfortunately, some goose nails tend to be dark, making it hard to identify where the quick begins. Cutting the quick by accident can be painful and bloody, so it’s important to be very mindful about how much you trim.
You can make the process of nail trimming easier by soaking their feet in warm water or cleaning them thoroughly with a damp rag prior to trimming. Soaking softens the nails which makes them much easier to clip without the nail splitting. Clean toes also make the quick much easier to identify!
Gently rotate the bird onto their side if they aren’t too big that rotation would cause undue stress or respiratory distress. Cradle the goose into your arm to keep their wings secure. They should calm down a bit after some secure, gentle holding. If by yourself, use one hand to hold their foot and the other to do the trimming. Secure their foot with your thumb and forefinger to hold it still. They might be touchy- this isn’t out of pain but because of distaste towards their feet being touched.
Using a cleaned pair of pet or human toenail clippers, trim a very small amount of the goose’s nails at a time to prevent accidental quick cutting. Each time you snip, take a look at the remaining nail. If it changes hue even slightly, you’re very close to the quick and should stop trimming. If the nail is still too long and you’re near the quick (as it grows and recedes depending on overall nail length), you can wait a few weeks for the quick to retreat and then trim a little more, repeating the process of trimming and waiting until their nails reach a safe length.
In some instances, after you’ve trimmed the nails you may need to file down the remaining rough edges with an emery board or nail file to protect the goose from injuring themselves when they scratch. Make sure to clean nail clippers if they become dirty or come into contact with blood from hitting the quick before using them to trim another individual’s nails.
If You Draw Blood
If you accidentally draw blood, apply an astringent like a styptic pencil, styptic powder (such as Quick Stop), alum, or witch hazel. You can also dip the wound in cornstarch or flour to encourage natural clotting. Lacking these tools, you can also use a piece of toilet paper as if you’d nicked yourself shaving! If the bleeding doesn’t stop, you can use the tip of your finger to apply pressure for up to a minute and repeating until any bleeding ends. If you’re going to return a goose with a nicked quick to the flock, be sure to wait until the blood is definitely stopped and cleaned as birds sometimes like to bully flockmates who have open wounds.
Once you’ve managed a few geese’s nails, you’ll be a proud poultry pedicure provider in no time!
Much like the common advice given to humans, it’s important to regularly check the health of cows with a routine health check rather than waiting until a cow is showing signs of distress or illness. Not only will this help you get to know what all aspects of a healthy cow look and feel like, but familiarizing a cow with human handling might help them stay calmer in stressful situations. Be prepared to check them over every six to eight weeks*! For more information on why regular health checks are important, check out our resource here.
*A Health Check Every Six to Eight Weeks Means Daily Observation Our recommendation to conduct routine health checks every six to eight weeks must be done in conjunction with daily observation. Caregivers should be trained to observe animals both for behaviors that are abnormal for the species and also for behaviors that are abnormal for each individual, keeping in mind issues that are common in a particular species and their warning signs. Thoughtful observation plays a crucial role in catching health issues before they progress into more serious situations. Read more about daily observation for cow resident health and well-being here.
Residents With Challenging Backgrounds Close daily observation can be difficult with certain individuals or groups who come from challenging backgrounds. They may be more likely to hide signs of illness or injury, or they may not allow you to come close enough to them to thoroughly assess their well-being on a regular basis. Challenging backgrounds may include individuals who are not socialized, have lived feral, or were abused or malnourished. If you care for individuals who come from a challenging background, it is imperative to make time to foster a bond of trust so careful observation is possible. A monthly health check is recommended for these individuals until they exhibit signs that they feel safe and you are confident that close daily observation is possible.
New Resident? Conduct An Intake Evaluation! If you are conducting an initial health evaluation on a new resident, check out our intake evaluation resource to learn about what you should check for and document!
Supplies
Before conducting a health check, it’s helpful to gather any supplies you may need and have them arranged nearby for easy access. Having everything you will likely need nearby can make the process go more smoothly and, in the event that the individual must be restrained in some way for part or all of the health check, will reduce the amount of time they must be restrained. If you are performing a health check on someone with a known health issue, you may need additional supplies besides those listed below. Otherwise, supplies to have on hand during cow health checks may include:
Recordkeeping supplies
Gauze squares (non-sterile is typically fine, but there may be times when sterile gauze is necessary)
Exam gloves
Cow-safe topical disinfectant (such as dilute chlorhexidine)
Saline flush
Cow-safe ointments or creams such as a triple antibiotic ointment or silver sulfadiazine cream 1% (SSD)
Cotton-tipped applicators
Tweezers
Headlamp, penlight, or flashlight
Thermometer and lubricant (good to have on hand in case you suspect someone is ill based on health check findings and need to take their rectal temperature)
Towels
Stethoscope
Fly treatments or deterrents (during fly season)
What About Hoof Care Supplies? You may be wondering why hoof-trimming tools are not on this list. There may be times when an experienced caregiver does a little bit of maintenance on a particular resident’s hooves, but we recommend working with a professional farrier or experienced veterinarian to have cow residents’ hooves regularly assessed and trimmed. Additionally, we recommend consulting with a veterinarian if you suspect a resident has a hoof issue.
Conducting The Health Check
Ask An Expert Before regularly conducting cow health checks, you should have a veterinarian or compassionate care expert give you hands-on training so you can be the best cow health advocate possible. Being trained to rapidly distinguish abnormalities from normal anatomy and healthy conditions can be crucial in early health problem detection, and the sooner you are able to bring concerns to your veterinarian, the sooner they’ll be able to work towards making a diagnosis and recommending any necessary interventions!
Additionally, you must be trained in proper technique in order to ensure both caregiver and resident safety. This includes understanding how to safely approach and be around cows, being able to read their body language, and being thoroughly trained in any restraint methods used.
Before beginning individual health checks (and, if possible, before entering your residents’ living space), it’s a good idea to take a few minutes to observe the group. Make note of their behavior, activity level, and general appearance. If residents are up, observe how they are standing and moving and whether or not they are actively eating. If they are lying down, make note of how they are positioned, whether or not they are chewing cud, and whether or not they are away from the herd or are the only one lying down.
If you use some form of restraint for health checks, now is also a good time to observe the respiratory rate of individuals in the herd since this may become elevated once residents are moved and restrained. While you can certainly assess the respiratory rate for each individual, for starters, you may simply spend a few minutes observing the group, checking to see if anyone appears to be breathing more rapidly or with more effort than the other residents. You could then take their respiratory rate and further evaluate them during their health check (or, depending on other signs they are presenting, you may opt to call your veterinarian). To assess a cow’s respiratory rate, watch their chest movements, counting how many times their chest expands/contracts over one minute. You want to count each paired expansion and contraction as one respiration. The normal resting respiratory rate for an adult cow is 12-36 respirations per minute, and the normal resting respiratory rate for a calf is 30-60 respirations per minute. Note that these are resting rates. Individuals who are active may have a higher respiratory rate. In addition to being an indication of illness, an elevated respiratory rate can also be indicative of a cow being stressed, hot, or in pain.
During this general observation of the group, watch for anyone who stands out as looking or acting differently from the rest of the herd. While this may not necessarily be an indication of a health concern, it certainly warrants further observation and assessment during the health check. For example, if you notice that only Gertrude is lying down while the rest of the herd is up grazing, you’ll want to keep an eye on her and gather more information to determine whether or not there’s a problem brewing.
For the individual health checks, some residents may allow you to check them without being restrained (perhaps while lying down, while eating, or while being brushed), but you may find that you cannot perform the entire health check in one “session” when doing it in this way. For example, while checking an individual who is lying down, you will be unable to thoroughly check one side of their body and will not be able to observe how the individual looks while standing (but you might get a great view of the bottom of their feet!). In this case, you would want to be sure to check their other side and assess their comfort when standing and walking before considering their health check “complete.” Be sure to take good notes so you can keep track of the areas that still need to be checked.
Get Serious About Safety!
Before we talk about how to conduct a cow health check, there are some important safety considerations to discuss. While touch plays an important role in health checks, generally, when it comes to cows and other large mammals, such as horses, you may have to rely on visual evaluation in order to avoid putting yourself or others at risk of severe injury. Below, we’ll mention some of the more common safety risks that come up when performing certain parts of the health check, but please be aware that these are far from the only possibilities. This is not to scare anyone or to discourage folks from rescuing or caring for cows, but we know from personal experience that it’s not uncommon for caregivers to focus solely on the resident’s safety while making concessions about their own. Because sometimes the same folks who dedicate their days to caring for others need gentle reminders about caring for themselves, we’re here to remind you that caregiver safety is just as important as resident safety.
While cows are not inherently dangerous, it is important to consider the size and strength difference between some full-grown cows and humans. This size difference, plus their speed, powerful swinging head (not to mention horns in some cases), and ability to kick, can result in serious injury. Particularly if you do not have a lot of experience working with cows or are working with a new cow resident whom you do not yet know well, it may be that you must rely more on visual assessment than you would for other species. You’ll also want to consider the individual cow and how they react to restraint and human touch. That said, it’s important to note that even folks with a great deal of experience working with cows may not be able to safely perform more than a visual assessment during certain parts of a health check, and cows who are generally very amenable to human touch may react very differently if they are startled or are in pain.
In addition to the considerations listed above, whether or not you can touch certain parts of a cow’s body will be impacted by different restraint methods. While some cows may be able to be safely evaluated without restraint, others may require restraint, such as being tied off with a rope halter or being guided into a chute system. Make sure you are properly trained in whatever restraint method you use and that you are aware of the resident and caregiver safety risks of each so you can prevent injury. For example, some chute systems have panels with horizontal bars, and this may seem like it makes touching the cow much easier than if the panel was solid. However, reaching through the bars can result in serious injury to your limb if the cow moves (which, among other things, could result in your limb being crushed between their body and the bar) or if the individual kicks (which could result in a much more serious injury than what the kick alone would cause since you have the added force of your limb being thrust into the bars). Proper training is imperative to avoid putting yourself or your residents in situations that increase the risk of injury.
When In Doubt… Unless you are a qualified veterinarian or have been trained to handle specific conditions, The Open Sanctuary Project strongly advocates that you promptly report any concerns you find during the course of a health check to your veterinarian (if you aren’t sure if what you are seeing is cause for concern or not, a more experienced caregiver may be able to help you, but if you are ever in doubt, we recommend erring on the side of caution and reaching out to your veterinarian). You should be the resident’s advocate, not their doctor! Additionally, routine health checks performed by a caregiver are not meant to be a replacement for a veterinary exam. The goal is to catch potential signs of concern as early as possible so you can bring concerns to your veterinarian. They can perform a more in-depth physical examination of the individual and conduct diagnostic testing as needed.
If you see something that you think warrants a hands-on evaluation but do not feel you can safely do so, be sure to enlist an experienced veterinarian for assistance.
Up next, we’ll go over important components of a health check. Please note that while these “steps” do not have to be completed in the order listed below, having a set order you follow consistently is helpful to avoid accidentally missing a step.
Check their weight and body condition
Monitoring your cow residents’ weight and body condition gives you important information about their health and, particularly in the case of unhealthy weight gain, their risk of certain health challenges. A healthy, mature cow should generally maintain a steady weight, though seasonal diet changes may result in slight herd-wide fluctuations (extreme herd-wide fluctuations are an indication that you should reassess the herd’s diet). If at all possible, it’s a great idea to invest in a scale that can accurately weigh your residents. This may not be possible for everyone, in which case you will rely primarily on assessment of an individual’s body condition. We recommend working with a veterinarian for proper training in body condition scoring to ensure the most accurate results. However, it is important to consider that the body condition of a sanctuary cow may be different from that of a cow whose body is exploited for milk production or breeding. Additionally, the body condition of a Hereford is going to be different from that of a Holstein.
It is not uncommon for sanctuary cows to be above the “ideal” body condition. Obesity can predispose individuals to health issues such as foot and leg problems, so it’s important to provide residents with a diet that does not lead to excessive weight gain. However, it’s also important to consider that because sanctuary residents are often considered “over conditioned” and have a higher than “ideal” body condition score, in the event that you are worried that an individual has lost weight, these concerns may not always be taken seriously if the individual in question appears, by industry standards, to be at an ideal weight. This is one of the many reasons why tracking body condition scores and, whenever possible, the resident’s weight is helpful. It gives you more information to share with your veterinarian regarding what is normal for the individual in question and the rate at which their body condition/weight has changed.
If a resident is losing weight, be sure to work with your veterinarian to determine the cause. You’ll also want to discuss how the individual is doing overall. Losing weight despite a healthy appetite will suggest different possibilities (such as Johne’s disease) than weight loss accompanied by inappetence. Particularly in elderly cows, weight loss might be the result of dental disease and may require permanent alterations to the individual’s diet.
Check their head and neck
While caution should be observed during all portions of the health check, when examining their head, make sure that either the cow’s head is securely restrained or that you keep your own head out of their head-swinging range. It’s easy to get wrapped up in performing the health check, but you must take care as a cow swinging their head (or horns!) into your head can result in serious injury! Even the friendliest cow might swing their head unexpectedly, so caution is always advised.
Checking specific areas (such as the eyes and ears) is discussed in detail below, but you can start by checking their head for any sign of asymmetry or a head tilt. If a resident has a head tilt or one side of their face is drooping, this is cause for concern, and your veterinarian should be consulted. If an individual has a very dirty face, this may be an indication that they are having trouble getting up and are using their head to assist them in this process. It’s a good idea to observe how these individuals move and observe them while rising.
If the individual has horns or scurs (horn-like tissue that, unlike a true horn, is attached to the skin rather than the skull), check that these are not growing in such a way as to cause injury or irritation to the face. Work with your veterinarian to determine the best course of action if a horn or scur is causing a problem.
Feel along the neck for any lumps or lesions. To check for dehydration, pinch the skin on their neck and observe how long it takes for the skin to return to its normal position. In a well-hydrated cow, the skin will bounce back into place within one second. In a dehydrated cow, the skin will hold the tent shape before slowly returning to normal.
Check their eyes
Cows should have clear, bright, alert eyes. Be aware that some breeds, such as Jerseys, normally exhibit some degree of exophthalmos (eye bulging) more often than other breeds. Carefully lifting the cow’s head into an upright position (if possible and safe to do) will allow you to check the white of the eye. Thin blood vessels in this area are normal, but thickened blood vessels should be noted. The pupil is most easily seen with a light and will often appear as a bluish horizontal rectangle or narrow slit (it contracts and expands in response to light). A slow pupil response could be a sign of low calcium. Check the eye for cloudiness, discoloration, lesions, or growths. Also, check the third eyelid for discoloration or lesions, as this is a common site for eye cancer. In the early stages, eye cancer lesions can be as small as a grain of rice, and surgical removal (by a licensed veterinarian) is easiest when lesions are small and contained to the third eyelid, so careful evaluation of this area is important.
Check for ocular discharge, which could be a sign of illness, injury, or irritation (such as from flies). Speaking of flies, during fly season, be sure to watch for early signs of pinkeye (and talk to your veterinarian about vaccinating your cow residents for this contagious condition). Signs of pinkeye include runny and squinty eyes, redness and swelling, holding an affected eye closed, and, as the disease progresses, thick ocular discharge and a cloudy/opaque cornea.
Also, pay attention to how the eye is sitting in the socket. If a cow’s eyes appear sunken into the head, this often indicates dehydration.
Check their ears
A cow’s ears should move in response to the sounds around them. They should not be droopy unless this is typical for their breed. Droopy and/or cold ears are typically signs that a cow is not feeling well. Droopy ears can also be the first sign of Mycoplasma infections in calves. The ears should not have any discharge, crustiness, or odor.
Check their nose
A cow’s nose, including inside their nostrils, should be shiny and moist, not dry. However, nasal discharge beyond a small amount of clear fluid is cause for concern. Their nose should also be free of lesions. If you place your hand in front of their nose, you should be able to feel an equal amount of air coming from both nostrils. Their breathing should not be labored, elevated, or have abnormal sounds (such as wheezes or rattles). Open-mouth breathing, coughing, or a foul odor on their breath are also cause for concern (a hint of rumen smell to their breath is not unusual). Contact your veterinarian if a resident is showing any of the signs listed above.
Check their mouth and jaw
Feel along the lower and upper jaw as well as down the bridge of the nose for any lumps, lesions, or areas of swelling. Firm swelling of the jaw can be a sign of lumpy jaw (actinomycosis). Also, make note of the area under the jaw, checking for fluid build-up (bottle jaw). Anyone with bottle jaw or oozing lesions on the jaw should be evaluated by a veterinarian.
The cow’s lips should not be loose, and their tongue should not be hanging out of their mouth. Check for excessive drooling, which can indicate an issue. Checking inside a cow’s mouth is challenging and should not be performed unless you know how to do so safely. An examination of the inside of their mouth may be best to save for when your veterinarian assesses your residents. However, while we’re on the subject of a cow’s mouth, we want to point out that cows do not have upper front teeth, which is sometimes alarming to new caregivers! Instead, they have a dental pad.
Check their rumen
As ruminants, assessing the digestive tract is an important part of evaluating cow health. While your veterinarian can perform a more in-depth evaluation of a cow’s digestive system, you can assess your cow residents’ rumen (and get an idea of if they are eating) by observing and feeling the paralumbar fossa on their left side, which is the triangular area behind the last rib and in front of the hip (hook) bone (as highlighted in the graphic below). Make sure you are checking the cow’s left side (if you stand behind the cow and face them, your left is their left) – the rumen, which is the largest stomach compartment, sits in this area.
If the cow has eaten recently, the paralumbar fossa will be about flush (give or take a little) with the last rib. If they have not been eating, this area will be depressed with a clear outline of the triangular area. If the paralumbar fossa is distended significantly past the last rib and/or feels tight, this indicates bloat, a potentially life-threatening condition. Other signs of bloat include labored breathing, grunting, open-mouth breathing, extending their neck, frequent urination, and other signs of discomfort. As the condition progresses, the cow may become recumbent. When you tap on the paralumbar fossa of a bloated cow, it may produce a kettle drum-like sound. Contact your veterinarian immediately if a resident is showing signs of bloat,as prompt intervention is imperative.
A healthy rumen should feel doughy with some resistance when pushed. You can also listen for healthy rumen contractions by placing a stethoscope or even just your ear against this area. You should hear a rumen contraction (sometimes described as sounding like a thunderstorm, dull roar, spinning washing machine, or flushing toilet) approximately 1-2 times per minute. You can listen to a normal rumen contraction here. If you note long gaps between contractions or weak contractions, please consult with your veterinarian.
Within the highlighted area is the triangular recess of the paralumbar fossa located behind the last rib and in front of the hip bone.
Check their sides, underside, and back
While checking their rumen does require checking part of their left side, you want to also take time to check the rest of their left side as well as their right side, underside, and back. Look (and when safe, feel) for any lumps, swelling, wounds, etc. While checking the cow’s left side, you can listen to their heart and record their heart rate. To do this, place the stethoscope on their left side, behind their elbow. The normal resting heart rate for an adult cow ranges between 40-80 beats per minute. By conducting regular health checks (and taking notes!), you’ll be able to learn what is normal for each resident, which will allow you to recognize when someone’s heart rate is abnormal. Consult with your veterinarian if you have any concerns about a cow’s heart rate or the way their heart sounds.
Be sure to check their body for pressure sores, particularly in the areas that typically make contact with the ground when the cow is lying down. Early signs of pressure sores include hair loss and irritated or thickened skin before becoming open sores or scabbed areas.
When checking male residents, also check (often just visually) their prepuce for any signs of swelling, scabbing, oozing, or prolapse. If they urinate during the health check, watch that they are not straining and that they have a normal stream of urine. Straining, dribbling urine, or producing a weak stream of urine could be signs of urinary blockage, and your veterinarian should be contacted immediately. Check the udder of female residents, looking for signs of mastitis such as heat, swelling, firmness, pain, or discharge. Contact your veterinarian immediately if you suspect mastitis.
Please note that some adult cows have a noticeable navel, which will appear as a lump on their underside (in males, it will typically blend into the prepuce). Folks sometimes confuse this with a sign of concern or mistakenly think it is the prepuce and end up thinking that a female resident is male.
When checking a cow’s back, make note of any arching when the individual is standing. Their back should be fairly flat. Arching could be a sign of hardware disease or another issue. Contact your veterinarian immediately if you suspect hardware disease.
Check their legs
This is another portion of the health check that may rely more on a visual assessment. Carefully check their front and back legs for any signs of swelling, particularly noting if there is any asymmetry between the right and left corresponding legs (i.e. note if a cow’s front right leg is larger than the front left leg). When checking the front legs, be sure to continue your observation all the way up into their shoulder area and in the back, all the way up to the hips. Particularly when checking their back legs, look for any signs of pressure sores (hair loss, irritated skin, scabs, or open sores). While a cow’s hips should be symmetrical and level, it is not uncommon for the hips to be uneven, particularly in older residents. Your veterinarian can further assess the individual and make care recommendations. While observing the legs, make note of any muscle twitching, as this could be cause for concern.
In addition to checking the appearance of the legs, also check for any signs of pain by observing how they stand and move. They should bear weight evenly, and there should be no crepitus (cracking or crunching sounds) when they move. Osteoarthritis is quite common in cows as they age, so it’s important to closely monitor their mobility and discuss any concerns with your veterinarian. An appropriate pain management plan is an important part of caring for arthritic residents.
Check their feet
Check the cow’s hooves for signs of overgrowth or hoof cracks, and consult with your veterinarian or farrier if someone needs their hooves trimmed. Check the coronary band for swelling, redness, warts, or other lesions. If you are able to feel this area, you can also check for heat or pain. Also, check that the individual does not have debris stuck between their claws, which can make walking uncomfortable. If the individual is lying down and will allow you to do so, you can check the bottom of their feet, looking for bruising, discharge, inflammation, or necrosis. Make note of any unusual odors coming from their feet which could be indicative of footrot or a ruptured abscess.
Pay attention to how the individual is standing and walking. A cow with an abscess in their foot may refuse to put any weight on the affected claw, which can be quite alarming. However, once the abscess is opened, either by a veterinarian or by rupturing on its own, the cow will be much more comfortable. If you are concerned that a cow has a hoof abscess, have your veterinarian out right away to assess.
Be sure to contact your veterinarian immediately if a resident is showing issues with their feet. To help ensure cow resident hoof health, be sure to have their hooves evaluated and, if needed, trimmed by a professional at least every 6 months (though some individuals may need more frequent trimming than this).
Check their rear end
A cow’s rear end and tail should be relatively clean, though they may have loose stool while on pasture, which can result in some poop on their tail or bum. Check their tail for signs of injury (including fracture) or paralysis. If the hair at the end of their tail is close to touching the ground, it should be trimmed to prevent other cows from stepping on it (which can result in terrible injury to the tail).
Check that their rectum is not prolapsed. When checking females, be sure to check their vulva, looking for , discharge, discoloration, or scabbing.
Check their hair and skin
The cow should have a smooth and shiny hair coat, though their winter coat may look a bit rougher than their summer coat. Check for any areas of hair loss (seasonal shedding is normal), which could be an indication of external parasites. If you are able to touch the cow, feel for any lumps, sores, or dry patches. Be sure to investigate if a cow is showing signs that part of their body is itchy (signs include frequently licking or rubbing the area), and be sure to look more closely at any area that is covered in flies, as this could be a clue that they have an open wound and are at risk of developing flystrike.
Isolate if necessary
If you notice that a cow is unhealthy, it’s crucial to consult with a veterinarian or compassionate care expert and prioritize accurately diagnosing the problem. Depending on the health concern, it may be necessary to isolate the cow in order to protect the rest of the herd from a potentially infectious disease. However, with some illnesses, such as pneumonia, once a cow is showing symptoms, the other residents in the herd may have already been exposed. In these instances, you will need to weigh what is in the best interest of all of your residents. A sick cow who is isolated from their herd may become more stressed, which could delay recovery. Depending on the health concern, separating the cow with a calm companion might be a good compromise.
You can read more about considering alternative living arrangements in response to a health issue here.
Though it may seem like an overwhelming amount of factors to be aware of, once you’ve gotten to know a cow and what good cow health looks like, you’ll be an excellent cow health ally in no time!
Non-Compassionate Source? If a source includes the (Non-Compassionate Source) tag, it means that we do not endorse that particular source’s views about animals, even if some of their insights are valuable from a care perspective. See a more detailed explanation here.
How to Conduct A Horse Health Check
Updated June 30th, 2021
Much like the common advice given to humans, it’s important to regularly evaluate the health of horses with a routine health check rather than waiting until a horse is showing signs of distress or illness. This is in addition to the veterinary exam every horse resident should receive, ideally every 6 months, but definitely annually. Not only will this help you get to know what all aspects of a healthy horse looks and feels like, but familiarizing a horse with human handling might help them stay more calm in stressful situations. You will also learn more specifically what is “normal” for the individual horse. Be prepared to check them over at least every six to eight weeks*! For more information on why regular health checks are important, check out our resource here.
Problem Signals
By paying regular attention to the herd, you may see some subtle cues in the event that something is amiss. A sick, injured, or otherwise distressed horse may:
Avoid contact or appear nervous more often than they used to
Change their daily schedule or general behavior
Have labored breathing, coughing, choking, sneezing or a constantly open mouth
Be immobile, inactive or unresponsive to your approach; depressed
Be stretched out or frequently sitting and standing in order to relieve colic
Frequently tremor or lack coordination
Be standing splay-legged
Be sitting or lying down far more often than usual
Avoid or be rejected by the rest of the herd
Stamp their feet
Grind their teeth frequently
Have a limp in their step
Have unusual or abnormal droppings including diarrhea, blood in stool, or worms
Be less hungry or thirsty, or drink water excessively
Have an odd posture like hunching over or avoiding putting weight on one of their legs
Droop their head and ears
Have one side of their face exhibiting paralysis
Have a bulge or non-uniform abdomen or belly (could indicate a serious parasite infection)
Have an abnormally strong odor
Sweat more than usual
Have an increased digital pulse
Hot hooves and area around coronary band
Have an internal body temperature not in the range of 99-101 degrees Fahrenheit (37.2-38.3 degrees Celsius) or possibly a degree or so higher if it is really hot out (a foal’s range will be slightly higher 99-102 F / 37.2-38.9 C)
Have a resting heart rate outside of 28-44 beats per minute. Although heart rate in the 30s is the norm for many horses, some horses have lower or higher heart rates you should know their baseline resting heart rate and speak with a vet to confirm this is normal for them and not part of an underlying health problem. (smaller and younger horses will be significantly higher)
Have a respiratory rate outside of 8-15 breaths per minute (fear and high temperatures can increase breathing rate)
Have pale mucous membranes
Have unusual abscesses on their body or in their mouths (potentially signifying a serious infectious condition called Pigeon Fever)
Be reluctant or averse to urinating or urinating frequently
Squinting an eye or blinking an eye a lot
In cases of symptoms such as the ones above, it’s especially important to conduct a health check on the horse. Generally, the health check should begin at their head, working your way back and down. It’s important to keep regular documentation of these checkups, including weight and any abnormal findings, in order to keep an easy-to-follow set of information in case a veterinarian needs the horse’s history.
Conducting The Health Check
It can be easier to conduct the health check as they’re tucking in for the evening as they tend to be less fussy or when the farrier comes as you will be setting them apart (this may not work well for super stressed individuals). Before stepping into their living space, you should take note of the horse’s behavior. Are they acting differently than they usually do? How are they getting along with fellow herd-mates? How are they standing? Does something seem off? These clues can say a lot about a horse’s health.
If necessary, you may have to have a second caregiver on hand to help manage the health check or help restrain the horse with a halter. Once you have the horse calm and ready, conduct the following observations:
Just like the nails on your hands and feet, ducks have nails sheathed in keratin on their feet. And just like us, this consistently growing material needs to be maintained for their health. A duck in a sanctuary environment of frequent straw and dirt underfoot might not have enough rough surfaces to naturally wear down their nails, so you should plan to assess their nail length and trim as needed when you conduct a duck health examination.
Signs You Should Step In
You should schedule a trimming if a duck’s toenails grow to the length where they begin to grow far past their toe tips, become dangerously sharp, begin to curl, or become ingrown (sometimes in circumstances where they don’t have enough hard surfaces to scratch against, sometimes by virtue of their genetics).
Pre-Trimming Suggestions
Carefully corral and pick up the duck. If they’re too stressed to be held, you must set them down and give them time to calm down before trying again. This process may be aided with a second set of helping hands holding the duck if you or the bird are nervous!
How To Trim A Duck’s Nails
Trimming a duck’s nails is very similar to trimming a cat’s or dog’s nails. Like cats and dogs, ducks also have a sensitive area made of soft tissue in the center of their claws known as the quick. Unfortunately, some duck nails tend to be dark and, therefore, much more difficult to identify where the quick begins. Cutting the quick by accident can be painful and bloody, so it’s important to be very mindful about how much you trim.
You can make the process of nail trimming easier by soaking their feet in warm water or cleaning them thoroughly with a damp rag prior to trimming. Soaking softens the nails which makes them much easier to clip without the nail splitting. Clean toes also make the quick much easier to identify!
Gently rotate the bird onto their side if it doesn’t cause respiratory issues or stress. Cradle the duck into your arm to keep their wings secure. They should calm down a bit after some secure, gentle holding. If by yourself, use one hand to hold their foot and the other to do the trimming. Secure their foot with your thumb and forefinger to hold it still. They might be touchy- this isn’t out of pain but because of distaste towards their feet being touched.
Using a cleaned pair of pet or human toenail clippers, trim a very small amount of the duck’s nails at a time to prevent accidental quick cutting. Each time you snip, take a look at the remaining nail. If it changes hue even slightly, you’re very close to the quick and should stop trimming. If the nail is still too long and you’re near the quick (as it grows and recedes depending on overall nail length), you can wait a few weeks for the quick to retreat and then trim a little more, repeating the process of trimming and waiting until their nails reach a safe length.
In some instances, after you’ve trimmed the nails you may need to file down the remaining rough edges with an emery board or nail file to protect the duck from injuring themself when they scratch. Make sure to clean nail clippers if they become dirty or come into contact with blood from hitting the quick before using them to trim another individual’s nails.
If You Draw Blood
If you accidentally draw blood, apply an astringent like a styptic pencil, styptic powder (such as Quick Stop), alum, or witch hazel. You can also dip the wound in cornstarch or flour to encourage natural clotting. Lacking these tools, you can also use a piece of toilet paper as if you’d nicked yourself shaving! If the bleeding doesn’t stop, you can use the tip of your finger to apply pressure for up to a minute and repeating until any bleeding ends. If you’re going to return a duck with a nicked quick to the flock, be sure to wait until the blood is definitely stopped and cleaned as ducks sometimes like to bully flockmates who have open wounds.
Once you’ve managed a few ducks’ nails, you’ll be a proud poultry pedicure provider in no time!
When it comes to llamas, if you want to ensure that you treat any health challenges as early as possible, you’ll have to spend a lot of time with the herd, so slight changes and symptoms are more apparent to you. By conducting regular full body health evaluations, you’ll be able to know what healthy looks and feels (and smells!) like, and when you should be concerned.
In llamas, abscesses refer to lumps, boils, or bulges, typically near their neck or shoulder, but with the possibility to form anywhere. Abscesses can grow until they burst and secrete pus. Abscesses can form for a variety of reasons, from infections, to poor wound treatment, to incorrectly performed needle injections. Mouth abscesses can form when a llama bites their cheek. Abscesses can also form as a result of Caseous Lymphadenitis, a highly contagious condition (see more below). If you have a female llama who is currently nursing a cria and they develop an abscess on their udder, the cria should not feed on the udder until the abscess’ cause is diagnosed to ensure an infection is not transmitted. In the event of an abscess, it should be first diagnosed by a veterinarian, and typically it should be lanced and cleaned early on (any abscess on the face or neck should be treated by a veterinarian to minimize risk of major bleeding). It is possible your veterinarian may walk you through the steps to address an abscess. If they do, be sure to discard or sterilize anything that comes into contact with the pus and monitor the wound for up to a month. You may want to isolate the llama depending on the abscess size or location for this time period. You should get a sample of the pus cultured by a lab to determine the source of infection to prevent other llamas from possibly getting infected. Certain diseases will require additional care and treatment of the abscessed llama. (Back to top)
Anaplasmosis
This is a rare red blood cell infection in llamas. It is caused by a blood parasite that is typically transmitted by insects such as ticks and flies. It may be possible to also transmit the disease in the womb. Anaplasmosis presents itself as anemia, fever, and yellowing mucus membranes. An afflicted llama might also lose weight, suffer from depression, dehydration, constipation, and lack of appetite. A fully recovered llama might remain weak for the rest of their life. If you suspect Anaplasmosis, contact your veterinarian immediately. There are medicinal treatments available for Anaplasmosis. (Back to top)
Anemia
Anemia in llamas can be characterized by pale skin, especially a pale color in the inner membrane of their lower eyelid. A healthy llama has a bright pink eyelid. If it is white, they may be very anemic. An anemic llama might also be more lethargic, have a dull or shabby coat, lose weight, or stop eating as frequently. Anemia could be a result of parasites or parasitic disease (especially Anaplasmosis or Barber Pole), lice, fleas, ticks, blood loss, or poor diet. Advanced anemia in llamas can lead to Bottle Jaw (see below). Anemic llamas can be treated with high protein food on a temporary basis, as well as additional minerals or iron supplements, probiotics, and vitamin B-12 to help restore red blood cells. An extremely anemic llama may require a blood transfusion. If a llama seems to have anemia rather suddenly, you must test them for Mycoplasma haemolamae, which can be fatal for llamas if untreated. You can test for anemia in llamas with the FAMACHA system. (Back to top)
Anthrax
Anthrax is caused by Bacillus anthracis spores, which can lie dormant in soil across the world for many years. The bacteria can activate and contaminate soil and grass in certain weather conditions, especially wet and cool weather followed by hot and dry weather. Animals that graze are susceptible to the disease after eating contaminated grass. Symptoms include depression, incoordination, staggering, trembling, convulsions, excitement, bleeding, and unfortunately, typically death. If you suspect a llama is suffering from anthrax, you must contact your veterinarian immediately. Anthrax can quickly spread to other animals from the infected llama, including humans. Confirmations of anthrax must be reported to government officials. If it is treated very early on with antibiotics, it is possible for llamas to survive. There is also a vaccine available for anthrax. (Back to top)
Arthritis
Like most animals, llamas can become prone to arthritis as they get older. Arthritis can also be caused by injury, infection, malnutrition, and a lack of space to move freely. Symptoms include less motion, laying down more often, weight loss, shabby coat, strange gait, and swollen joints. Treatment for arthritis differs depending on the root cause, so if you believe that a llama is suffering from arthritis, it’s important to consult with your veterinarian. For arthritis caused by old age, there are a number of llama-safe anti-inflammatory supplements and NSAIDs such as Meloxicam available to ease swelling and pain. For a more longterm solution for arthritis, you can administer a Chondroprotective agent such as Adequan to help repair joint cartilage and soothe inflammation. We have also seen success treating arthritis pains with more natural remedies such as Botswella (also known as Indian Frankincense) to successfully lower inflammation as well as anecdotally, CBD oil. Make extra sure that their environment is as arthritis-friendly as can be, minimizing steep grades or long walks to food or water if you can! (Back to top)
Barber Pole
Barber pole worm (Haemonchus contortus, sometimes called wireworm) is a gastrointestinal roundworm that can cause serious disease in sheep, goats, llamas, and alpacas. While other gastrointestinal parasites can cause illness in small ruminants and camelids, barber pole worm is especially dangerous because it is a blood-sucking parasite that has the potential to cause life-threatening anemia. To further complicate things, anthelmintic resistance (resistance to dewormers) is a serious and growing issue, though the degree of resistance and to which drugs worms are resistant will vary region by region and also property to property. For more information on barber pole worm, including ways to slow the development of anthelmintic resistance, check out our in depth resource, here. (Back to top)
Bottle Jaw
Bottle Jaw presents itself as a very swollen lower jaw in a llama. This is caused by extreme anemia in the llama resulting in watery tissue in their jaw, and requires immediate intervention to reverse their anemia, which could be life-threatening. (Back to top)
Bovine Virus Diarrhea
BVD is a contagious viral infection caused by Bovine Viral Diarrhea Virus (BVDV). While cows are the natural host for this virus, camelids, and other species can be affected too. Though the name suggests gastrointestinal disease, BVDV can affect multiple body systems, resulting in respiratory, reproductive, circulatory, musculoskeletal, immune, organ, or neurological health challenges as well as gastrointestinal issues. Symptoms may include fever, diarrhea, mouth sores, anorexia, abortion, birth defects, and ill thrift. BVDV can cause subclinical disease or acute illness, but the most concerning characteristic of this virus is its ability to create persistently infected (PI) individuals. Crias are often persistent infection individuals and a common cause of herd infections. They are infected as fetuses and shed the disease after birth, spreading it to other individuals. Afflicted crias may have symptoms or appear perfectly healthy. Those who are acutely infected with BVDV may be asymptomatic, but the infection causes immunosuppression, putting them at risk of developing other infections. There is no treatment for BVDV infection, but depending on the severity and clinical signs, individuals may require supportive care and broad-spectrum antibiotics to prevent secondary bacterial infections. While there are vaccines for cows, both live and inactivated vaccines, they are not currently recommended for camelid species due to a lack of data on safety and efficacy. Learn more about BVD with our resource here.
Caseous Lymphadenitis (CL)
CL is a chronic disease caused by the bacteria Corynebacterium pseudotuberculosis which can cause localized enlarged pain-free abscesses on a llama’s skin, lymph nodes, and organs. External CL refers to abscesses on the skin, which can become internal through blood or the lymphatic system, moving on to affect a llama’s lymph nodes and organs. If it spreads internally, CL can affect a llama’s lungs, liver, and kidneys. If a llama has an abscess on their skin, you should separate them from other llamas, goats, and sheep, and have your veterinarian culture the abscess’ pus, which can highly accurately determine whether it is CL. If the llama tests positive for CL, the pus in their abscesses can spread the disease to other residents. Other symptoms of CL can include anemia, lack of appetite, weight loss, and fever. It is possible (though very rare) for CL to spread to humans, so it’s important to maintain good biosecurity when handling llamas suspected of having CL. (Back to top)
Coccidiosis
Coccidia are parasites which can damage a llama’s small intestinal lining. Most adult llamas are infected and immune, but much younger llamas are at risk of fatal infestations. An acute infection can lead to anemia, dehydration, fever, hair loss, weight loss, stunted growth, and bloody, mucus-filled diarrhea. Usually Coccidiosis is a result of overcrowding, stress, and poor sanitation. The best prevention is keeping the llama’s living space clean and uncrowded! There are medicines available to treat infections. As a preventative measure, you should have a lab perform a fecal test on llamas every three months to ensure that they are not facing a dangerous parasitic infection. (Back to top)
Dropped Pasterns
When a llama walks on their pasterns rather than their feet, typically this is because they are experiencing foot pain, either from arthritis, foot rot, or mange. It can also be a symptom of excess body weight. (Back to top)
Enterotoxemia
Enterotoxemia is a range of diseases that can affect a llama. The most well-known type of Enterotoxemia, “Pulpy Kidney Disease”, occurs when a llama gets indigestion or overeats. If a feeding source changes suddenly or a llama begins eating too much, a common organism in their gut begins to reproduce quickly and produces a toxin which can cause uncoordinated movement, convulsions, then death. Caught early, Enterotoxemia can be treated with CD antitoxin. There is also a vaccination available to prevent it. (Back to top)
Foot Rot
Foot rot refers to a bacterial infection of one or more feet of a llama, which can come on from chronically damp or muddy walking conditions for the llama as well as a zinc deficiency. A symptomatic llama may be less mobile or even exhibit signs of lameness, have swelling between their toes, lumpy foot pads, and have an elevated internal temperature. An untreated case of foot rot quite literally begins to rot, leaving a very bad smelling creamy discharge. To treat, you must clean and carefully remove the rotten parts of the foot that you can, and treat the affected feet with iodine and antibiotics if severe. Although llamas do not suffer from contagious foot rot like goats and sheep, the bacteria in llama foot rot can be contagious for up to 7 days. Contact your veterinarian if you suspect foot rot, because it can cause tissue and nerve damage. (Back to top)
Internal Parasites
There are a number of internal parasites that can affect a llama’s quality of life, and unfortunately a number of internal parasites that are resistant to common treatments. If a llama is suffering from an internal parasite, it is likely a strongyle, but there are other, more dangerous parasites such as lungworms, barber pole, and coccidia. Common parasite symptoms can include lethargy, diarrhea, clumped stools, weight loss, and anemia. As a preventative measure, you should have a lab perform a fecal test on llamas every three months to ensure that they are not facing a dangerous parasitic infection and have appropriate treatment policies in place for infected llamas. (Back to top)
Johne’s Disease
Also known as paratuberculosis, Johne’s disease is a fatal contagious gastrointestinal disease caused by the bacteria Mycobacterium avium subspecies paratuberculosis (MAP). It is believed that all species of ruminants and camelids are susceptible to this infection, with young individuals being most vulnerable. The primary mode of transmission is the fecal-oral route, but it can also be transmitted via colostrum and milk. For more information about this challenging disease, including information regarding diagnostics and ways to mitigate disease spread, check out our full resource on Johne’s disease here. (Back to top)
Leptospirosis
Leptospirosis is a contagious bacterial disease that can affect most farmed animals as well as humans. Symptoms include fever, depression, lack of appetite, blood in urine, diarrhea, and jaundice. It is caused when a llama ingests contaminated food or water, especially from stagnant water. Llamas can become asymptomatic carriers for years and spread the disease by other animals coming into contact with their infected urine. There is a vaccination available. (Back to top)
Lice
Lice infections are very common and very unlikely to cause long term harm to llamas in mild infections. There are a number of llama-safe treatments for lice, but it’s important to begin treatment early on to prevent infestations to get out of control. You should be checking for lice every time you conduct a llama health checkup! (Back to top)
Listeriosis
Listeriosis is the result of an infection caused by the bacteria Listeria monocytogenes. In llamas, listeriosis is also known as “circling disease”, as it causes a llama to become weaker on one side of their body, leading them to only be able to walk in circles until they become completely paralyzed and die. Other symptoms include depression, lowered appetite, fever, stumbling, head pulling in one direction, facial paralysis, a loose jaw, and drooling. If you think a llama is suffering from Listeriosis, it’s critical that you get a veterinary evaluation. It can be treated with an intensive regimen of penicillin for up to two weeks. (Back to top)
Lungworms
Llamas and alpacas can become infected with Dictyocaulus viviparus, which typically infects cows, and D. filaria, which affects sheep and goats. However, these parasites tend to cause less severe disease in llamas and alpacas than in ruminant hosts. Lungworm infections in llamas and alpacas are more common in South America than in North America and some other parts of the world, but should be considered a possibility, especially if you have llamas and alpacas living with or sharing pasture space with ruminants. Both D.viviparus and D. filaria have a direct life cycle. Female Dictyocaulus lay eggs containing larvae in the lungs which are then coughed up, swallowed, and hatch into first-stage larvae before being passed in feces. Larvae develop into infective third-stage larvae on the pasture- how quickly this occurs depends on environmental factors. Infection occurs when infective larvae are ingested while animals graze. The larvae continue their development inside the host and travel to the lungs to start the process again. Signs of lungworm infection include coughing, nasal discharge, and labored breathing, but an infected individual may not show all of these signs at the same time. Secondary infections are possible which could result in fever. Diagnosis of lungworm infections can be difficult. In addition to looking at clinical signs, a fresh fecal sample can be evaluated using the Baermann technique to identify larvae. Fecal samples should be fresh, and it’s best to collect it directly from the rectum. Your veterinarian can recommend an appropriate anthelmintic treatment and determine if there is a secondary infection that requires treatment. (Back to top)
Mange
Mange is a skin condition caused by a very small mite. Mange presents as flaky and scruffy dandruff-like material on the skin as well as irritation. In more advanced cases, a llama may lose some hair and the underlying skin might become thick and hard. Mange can also affect a llama’s feet, causing itchiness, irritation, and difficulty walking. There are a number of medications available for mange depending on the type and location of the infection. (Back to top)
Mastitis
Mastitis is inflammation of a llama’s udder, usually as a result of a bacterial udder infection. A llama can have either acute mastitis or chronic mastitis, the latter typically undetected throughout a llama’s life. Acute mastitis presents itself as discolored, dark, swollen, and warm udders. An afflicted llama may not want to walk and might not be able to nurse any young. Mastitis can also be a secondary infection to sore mouth. It is treatable with antibiotics and anti-inflammatory drugs. (Back to top)
A common problem in llamas, Megaesophagus refers to a severely enlarged esophagus. This can lead to weight loss, frequent regurgitation or “frothing” of a llama’s food, and difficulty eating. There is no known treatment beyond supportive care for an afflicted llama. (Back to top)
Mycoplasma haemolamae
Typically transmitted by bloodsucking insects, Mycoplasma haemolamae is a blood infection that can affect llamas. Typically, a llama’s immune system with take care of infections, but younger, elderly, and immune system-compromised llamas can be dangerously infected. Symptoms include weight loss, depression, lethargy, anemia, watery blood, stiffness in hindquarters, and collapse. The disease can be fatal if untreated. (Back to top)
Parelaphostrongylus Tenuis (P. tenuis) is a parasitic worm whose natural host is the white-tailed deer. Camelids, sheep, and goats living in areas with white-tailed deer populations can also become infected by this parasite but are considered aberrant, or unnatural hosts. In these species, the parasite can cause significant issues not typically seen in white-tailed deer. Camelids appear to be more sensitive to the infection than sheep and goats, with llamas being the most sensitive unnatural host. This infection typically causes neurological symptoms. In some cases, early signs of infection include standing with a wide stance in the hind legs or weakness in one of both hind legs. These symptoms can then develop in to severe ataxia and hind limb paralysis. Affected individuals may also be seen circling, have a head tilt, or become blind. In some cases there is a sudden onset of severe symptoms rather than a gradual worsening of the condition. Presumptive diagnoses are made based on clinical signs and exposure risk- a fecal test will not detect P. tenuis in unnatural hosts. In some cases, examination of the cerebrospinal fluid may be recommended to help support the presumptive diagnosis, but this requires anesthesia and will not result in a definitive diagnosis. Absolute confirmation of P. tenuis can only be made during a post-mortem examination. Treatment typically includes a combination of multiple dewormers (often at higher and/or more frequent doses than when treating other parasites) and an anti-inflammatory medication. Because of their sensitivity to this infection, prompt treatment of llamas with suspected P. tenuis is imperative. One study found that severity of symptoms was not a reliable indicator of prognosis. Because this infection can have such devastating consequences in llamas and alpacas, some veterinarians may recommend prophylactic treatment- be sure to talk with your veterinarian as this may contribute to the growing issue of parasite resistance. (Back to top)
Pink Eye
Pink eye in llamas can be a serious disease, and comes in both infectious and noninfectious forms. Infectious pink eye is caused by either a viral or bacterial disease, sometimes via flies traveling from llama to llama. Early symptoms include eye discharge as well as red and swollen eyes. The cornea of the llama’s eye might become hazy or opaque. It is very important to treat all pink eye early in llamas as it can lead to blindness, and in dire cases, the infection can travel to the llama’s brain and become fatal. A llama with pink eye should be isolated to avoid spreading the disease and kept in a cool, shady location removed from sunlight. Noninfectious pink eye can come from eye abrasions, vitamin A deficiency, toxins, or stings, which can be treated with ointments (or in the case of Vitamin A deficiency, Vitamin A supplementation). Contact a veterinarian if you suspect a llama has pink eye, as there are a number of treatments available depending on the pink eye’s underlying cause. (Back to top)
Ringworm
Ringworm is actually a fungal infection of a llama, causing a skin lesion that sometimes, but not always, looks like a ring. It is spread in llamas through contact with spores that infect their hair and skin. The infected area loses hair and appears crusty. Typically, a ringworm infection affects a llama’s legs, feet, and face. Treatment involves cleaning off the crust the and application of a topical antifungal cream. Typically a treated infection will begin to improve in a few weeks. (Back to top)
Slaframine Toxicosis (“Slobbers”)
Slaframine Toxicosis is caused when llamas ingest forage infected with the fungus Rhizoctonia leguminicola (Black Patch disease). This fungus primarily infects red clover but can infect other legumes as well. Llamas eating infected pasture, hay, or silage typically show signs of slaframine toxicosis within an hour, with the first symptom being excessive salivation (hence, “slobbers”). Slaframine toxicosis can also cause diarrhea, inappetence, colic, frequent urination, tremors, and stiff joints. In most cases, early detection and removal of infected food sources results in symptoms resolving within one to three days, with significant improvement in 24 hours. Higher concentrations or more prolonged exposure to slaframine can result in dehydration, and in very rare instances, death. Plant and forage samples can be tested for Slaframine, but this test tends to be expensive. Instead, it may be easier to look for black patches on the red clover leaves and stems in your pasture or hay. Detoxification of infected pasture and hay is not possible, but there may be strategies you can implement to reduce the levels of slaframine present. Your local cooperative extension office or veterinarian should be able to offer recommendations. (Back to top)
Sore Mouth (Or, Orf)
Sore mouth is a viral disease caused by a relative of the chickenpox viral family. It enters a llama through cuts or abrasions of their skin (or through nursing in young llamas) and is highly contagious in both llamas and humans. Sore mouth symptoms include blisters in less hairy parts of the llama’s body, on their lips and mouth, with the blisters eventually becoming scabs. It is especially dangerous in young llamas, who may not be able to properly nurse when infected and can quickly become malnourished. It runs its course in three to four weeks. Afflicted llamas should be isolated during the course of symptoms. Treatment involves applying approved medicated ointments to sores and thoroughly cleaning anywhere where the affected llama had been spending time. It’s important to ensure that the sores do not develop secondary bacterial infections. Llamas can be carriers of the disease (and spread it to other llamas) without ever showing symptoms, and once a llama has had sore mouth, they are unlikely to ever become symptomatic again (just like humans with chickenpox). (Back to top)
Stomach Aches (Bloat or Colic)
Stomach aches in llamas can result from many different causes, some of which are far more dangerous than others. More serious stomach aches can be caused by eating too much grain or eating on a new or rich pasture, such as alfalfa. Symptoms of a dangerous stomach ache includes a distended abdomen, heavy or labored breathing, general signs of discomfort like refusing to eat, kicking at the stomach, teeth grinding, loud vocalizations, lying down with splayed hind legs, standing with a hunched back, strained pooping, and discomfort when their abdomen is touched. If you are concerned that a llama might be suffering from a stomach ache, it’s critical that you contact your veterinarian, as it can be fatal. It’s important that when a llama gets access to a new pasture, they should not be allowed to graze on it freely until their digestive system adjusts to it, especially if the pasture has quick growing plants like clover or alfalfa. You should introduce llamas to the new pasture for up to a week alongside their usual hay, only allowing for a few hours at a time. Secure grain bags from curious llamas, as they are susceptible to overeating and subsequent grain overload if given free access to food stores. Make sure that llamas have access to plenty of fresh water and fiber at all times to prevent stomach aches. (Back to top)
Tapeworms
One of many parasites that affect llamas, tapeworms can be diagnosed by finding yellow to white segments in a llama’s feces. llamas can become resistant to tapeworms relatively early on in life, so they do not pose too great of a health risk. Symptoms can include weight loss, sluggishness, and stomach discomfort. As a preventative measure, you should have a lab perform a fecal test on llamas every three months to ensure that they are not facing a dangerous parasitic infection and have appropriate treatment policies in place for infected llamas. (Back to top)
Upper Respiratory Infection
There can be a variety of different illnesses and parasites that can affect a llama’s breathing, nose, windpipe, and lungs. Symptoms of an upper respiratory infection include coughing, sneezing, nasal discharge, increased body temperature or fever, and loss of appetite. If you suspect a llama may have an upper respiratory infection, it’s important to get an immediate veterinary consultation to determine its cause as some infections are considerably more dangerous and harder to treat than others. (Back to top)
Urinary Blockage (Or, Urolithiasis)
Also known as kidney stones (in humans), these stones form when there is a large imbalance of calcium and phosphorus in a llama’s diet, leading to mineral crystals that block a llama from being able to urinate. The most typical case of urinary calculi in llamas comes when a male llama is fed too much grain or generally has a calcium phosphorus imbalance in their diet, sometimes from an alfalfa-rich diet. The best preventative measure is to make sure that you feed llamas products that are appropriate for foraging llamas. Be careful about feeding llamas an exclusive concentrate food as this can quickly imbalance their nutrition. Symptoms can include a llama having difficulty urinating or passing a trickle of urine at time. They might also act depressed, or stretch out their hind legs while they stand, walk more stiffly than usual, and generally prefer not to move. If you suspect a llama cannot urinate, it’s very important to contact a veterinarian immediately as this is very dangerous for their health. Urinary blockage is more rare in male llamas than goats and sheep, and even rarer in female llamas than the males. (Back to top)
White Muscle Disease
White muscle disease is a degenerative disease that can be found in both sheep and llamas. It is caused by a nutritional deficiency of selenium, Vitamin E, or both. White muscle disease can affect heart muscle, skeletal muscle, or both. When the heart muscle is afflicted, a llama might have fever, trouble breathing, and bloody, frothy nasal discharge. When the skeletal muscle is afflicted, a llama will have an arched back, appear to be hunched over, and move very stiffly. Affected llamas will also have a much weaker immune system. Vitamin E deficiencies are typically a result of insufficient forage nutritional quality, and selenium deficiencies are typically found where the soil lacks selenium in appropriate quantities for foraging llamas. Treatment involves giving llamas vitamin E and selenium nutritional booster shots, which should show positive results within a day. If you suspect a llama is suffering from white muscle disease, contact your veterinarian for evaluation and to get the appropriate injections. The best prevention is to ensure that llamas have access to nutritional sources that are rich in both vitamin E and selenium throughout the year! (Back to top)
Much like the common advice given to humans, it’s important to regularly assess the health of llamas with a routine health check rather than waiting until a llama is showing signs of distress or illness. Not only will this help you get to know what all aspects of a healthy llama look and feel like, but familiarizing a llama with human handling might help them stay more calm in stressful situations. Be prepared to check them over every six to eight weeks*! For more information on why regular health checks are important, check out our resource here.
Problem Signals
Due to llamas’ typically thicker coats, llamas require close examination to reveal potential ailments and injuries that you may not notice through a cursory observation. Llamas are also generally quite stoic and won’t show pain or distress until the symptoms prevent them from hiding it. By paying regular attention to the herd, you may see some subtle cues in the event that something is amiss. A sick, injured, or otherwise distressed llama may:
Avoid contact more often than they used to
Change their daily schedule or general behavior
Have labored breathing, coughing, sneezing or a constantly open mouth
Shake or tilt their head
Be immobile, inactive or unresponsive to your approach
Be stretched out or kicking at their stomachs
Be sitting far more often than usual
Avoid or be rejected by the rest of the herd
Be stamping their feet
Grind their teeth frequently
Have a limp in their step or avoid putting weight on one of their legs
Have unusual or abnormal droppings including diarrhea, blood in stool, or worms
Be less hungry or thirsty, or drink water excessively
Have an abnormally strong odor
Have an internal body temperature beyond the range of 99.5-101.5 degrees Fahrenheit (37.5-38.6 degrees Celsius), though when the weather is hot it could reach 104 degrees Fahrenheit (40 degrees Celsius)
In cases of symptoms such as the ones above, it’s especially important to conduct a health check on the llama. Generally, the check should begin at their head, working your way back and down. It’s important to keep regular documentation of these checkups, including weight and any abnormal findings, in order to keep an easy-to-follow set of information in case a veterinarian needs the llama’s history.
It can be easier to conduct the health check after the llama has eaten or as they’re tucking in for the evening as they tend to be less fussy. Generally, llamas are quite protective about sensitive parts of their body, so it may require a more gentle, patient touch to fully evaluate them compared to ruminants like sheep. Before stepping into their living space, you should take note of the llama’s behavior. Are they acting differently than they usually do? How are they getting along with fellow herdmates? These clues can say a lot about a llama’s health.
If necessary, you may have to have a second caregiver on hand to help manage the health check or help restrain the llama with a halter. Once you have the llama calm and ready, conduct the following observations:
Though it may seem like an overwhelming amount of factors to be aware of, once you’ve gotten to know a llama and what good llama health looks like, you’ll be an excellent llama health ally in no time!
Sheep hooves are made out of keratin – the same protein that makes up our fingernails and toenails. And just like our nails, a sheep’s hooves are constantly growing. In the wild, a sheep would naturally wear down their hooves while walking and grazing, but in most sanctuary environments, hooves will not be worn down enough through activity alone. Therefore, it is our responsibility to trim our residents’ hooves regularly to ensure their comfort and health!
The primary purposes of trimming a sheep’s hooves are to give them an even, comfortable walking surface to step on, and to clean out accumulated dirt and debris that might have gotten caught in their feet. Just like when trimming your fingernails, properly trimming a sheep’s hooves should not be painful. However, some individuals may take issue with the restraint required to properly assess and trim their hooves!
How often an individual needs their hooves trimmed depends on many factors such as their genetics, diet, other health issues, and their environment. We recommend checking sheep hooves during routine health checks and trimming as needed. However, older residents, individuals who are less active, and individuals with laminitis may need more frequent trimming. If you notice that someone’s hooves become very overgrown between health checks, you should implement a more frequent hoof trimming schedule for them. Additionally, any time you notice someone limping or showing reluctance to bear weight normally, be sure to check their feet. You may find that overgrown hooves or a rock stuck in their hooves is the culprit, and you may be able to offer near-immediate relief with a basic trim.
The hoof wall is the primary point of concern in typical sheep hoof trimming. Unchecked, the hoof wall will grow past the soft sole of the individual’s foot and begin to curl, which can create painful walking conditions and can trap dirt tightly against the sole of the foot.
Consider The Weather, If You Can! If possible, schedule routine hoof trims after heavy dew, rain, or snowfall – a sheep’s hooves are much softer and easier to trim after a day in moderately wet conditions (but be sure to avoid conditions that keep your residents’ hooves constantly wet). Very cold spells might not be the best time for hoof trimming because hooves can become very hard, making the trimming process more difficult.
Tools And Supplies
Some people prefer to wear thick work gloves for the trimming process, as hand protection can make this process much easier and more comfortable for you (especially if you are trimming many individuals in a row). Thick gloves can also protect you from cuts or stab wounds should the individual move or should your hand slip.
In terms of trimming tools, options include hoof shears or a rotary tool like the Hoof Boss. Having a paring knife and hoof pick can also come in handy. Be sure to properly maintain your trimming tools and to keep them sharp! Dull trimmers will just make the process more difficult and will prolong the amount of time the resident will need to be restrained. Also, if you are compensating for dull equipment by using extra strength/force, you could accidentally put undue strain on the individual’s joints, and you are more likely to hurt yourself.
Gentle Restraint
Gentle restraint plays an important role in the hoof trimming process. Sheep can be restrained in a standing position, in lateral recumbency (on their side), or in a seated position. When trimmed in a standing position, each leg will be lifted one at a time, requiring them to stand on the other 3 legs. Some individuals, especially those with OPP or osteoarthritis, may be too uncomfortable (or even unable) to support their weight in this way. In this case, you may opt to gently place them on their side, with someone holding them in place to prevent them from sitting up or flailing. Some sheep caregivers have had success using a “sheep hammock” or “deck chair” to restrain sheep in a seated position, and smaller sheep may do well when restrained sitting upright on their bum with a caregiver supporting them from behind. One benefit of both the laying down and seated methods is that if you have enough people on hand, you can trim multiple feet at once, reducing the amount of time the individual needs to be restrained. Additionally, in these positions, their feet can typically be trimmed without the need to bend or otherwise manipulate the position of their legs. For individuals with joint or mobility issues, this can make the process much more comfortable.
Aviv Caregiver holds Bean Sheep in a deck chair for hoof trimming. Photo Courtesy of Piedmont Farm Animal Refuge.
Residents may have a particular form of restraint that they are most comfortable with, so before you start trimming, take time to find a position that keeps them calm. Even if you have a go-to technique you prefer, you may find certain individuals or situations require something different, so it’s a good idea to get used to different forms of restraint.
Hammock Safety As mentioned above, some sheep caregivers have had good success using a sheep hammock for restraint during hoof trimming. If you opt for this method, be aware that it may not be a good option for individuals with full tails (which could be injured or even broken, depending on the hammock design) or individuals with certain health issues. Staff must be properly trained to safely move sheep in and out of this device, taking care not to get their back legs caught behind the hammock legs when lifting them into the hammock, which could cause serious injury. While in the hammock, watch the individual’s breathing closely and remove them from the hammock if they become overly stressed.
Standing Restraint
Because standing restraint involves carefully lifting the individual’s legs one at a time, let’s take a closer look at how to do this safely. For this method, most sheep will do best if they are standing with one side of their body against a wall or other sturdy barrier. If using a rope halter, be sure to tie them off with a quick release knot, and pay attention during the trimming process to make sure they do not put their head or neck in a dangerous position, and make sure the halter does not slip down over their nose, which can impede breathing.
“Pre-Medicating” Older Residents Because of the strain and joint flexion involved in hoof trimming while standing, some older individuals may benefit from being “pre-medicated” even if they don’t typically require pain medication for arthritis. This must be done in consultation with your veterinarian to determine if it is appropriate, but some sanctuaries have found that administering an NSAID for a few days prior to using standing restraint for hoof trimming can make the process easier on the individual and can prevent lameness afterwards.
Just as each resident will have their own preferences regarding restraint, the humans involved will have their own preferences, too. While there are a few different ways you can position yourself to trim hooves while the individual is standing, to trim their front feet, it’s often easiest to kneel down next to their shoulder (the one that is not against the wall) while facing towards their back end. This will allow you to use your body to prevent them from swinging away from the wall. You can then pick up their front foot by holding their foot and lifting it up towards their body, encouraging them to bend their carpus (“front knee”) into a natural position. There’s a chance that the individual may fight you on this. Sometimes kneeling next to them and supporting their weight by placing their bent carpus on your thigh can help keep them calm. If they are really resisting, it’s a good idea to stop and make sure that the position is not causing them discomfort. If it appears that they are uncomfortable having their carpus bent or are uncomfortable bearing weight on only 3 legs, you’ll need to make adjustments. If bending their carpus seems to be causing discomfort, another option is to extend their leg forward, keeping their leg straight (as if they were extending their leg to place it on something). This can be an awkward position for the human, so you may opt to trim them in a different position, such as on their side, instead.
Lifting a back foot can be a bit more tricky if the individual is especially fidgety or protesting. If you have another person available, it can be very helpful to have them stand or kneel just behind the individual’s shoulder. They can then be responsible for keeping the resident securely in place, which will allow you to find a position that is comfortable for you (and the resident, of course). Some people prefer to sit or kneel next to the individual, while others prefer to stand back-to-tail with the resident. When positioned in this way, you can then bend down and lift the leg, holding it between your own legs. If you are alone, you may need to kneel or stand next to the individual in a way that allows you to continue to use your body to hold them against the wall while bending down to lift the leg – depending on the size and temperament of the resident, this can be uncomfortable for the human and could lead to injury if done for long periods of time.
When lifting a back leg, make sure you do not lift it too high or you could cause injury. Keeping the hock bent and ensuring it is not raised above the height of the stifle while also keeping the foot below the level of the hock should prevent strain. If you prefer to trim the back feet while standing, as described above, be especially careful with shorter individuals, taking care not to lift their legs too high. It may be best to trim shorter residents while kneeling next to them rather than while standing (or you may opt to place them on their side or bum instead).
After you’ve trimmed both feet on their side that is not against the wall, you can gently reposition the individual so that their trimmed side is now against the wall, and use the same technique to lift the opposite feet.
Trimming The Hoof
The caregiver lifts Maxine’s back foot and begins trimming the overgrown hoof wall.
Seek Out Hands-On Training While this section discusses the trimming process, it is not a replacement for hands-on training. If at all possible, have a veterinarian or care expert give you hands-on training for this procedure! There are nuances in trimming technique that can not be conveyed through words alone.
If not already done, start by using a brush or piece of gauze to clean their feet of dirt or debris. This will make identifying the parts of their hoof much easier! It’s important to maintain the correct shape and angle of the hoof. In a properly trimmed hoof, the bottom edge of the hoof will be parallel to the coronary band (where the hoof wall and skin of the leg meet). The hoof wall and heel should also be relatively flush with the sole, though the outer wall should be slightly longer than the inner wall.
If the hoof wall is overgrown and folded over the sole, it’s best to start by carefully trimming the flap away. If the hoof is so overgrown that the inner and outer hoof wall curl over each other, you must trim carefully so as to maintain the proper shape and angle of the claw. To do this, remove the overgrown material by focusing on the parts of the hoof wall that are making contact with the ground (achieved by cutting with your trimmers parallel to the length of the foot, as shown in the photo above) rather than cutting across the toe tip to shorten it (with trimmers perpendicular to the length of the hoof). Take care that you do not trim the toe too short, as this will cause them to bear weight incorrectly (becoming “flat-footed” or bearing weight on their heels).
As you trim, you’ll find that the surface of the remaining hoof wall begins to turn white (or black, if they have black hooves). Take care to trim only a little bit at a time, being sure to stop if you start to see pink areas, which typically means you are approaching live tissue that will bleed and cause pain if trimmed. In some cases, even if you do not draw blood, you may still trim too far, resulting in sensitive areas of the foot that could cause discomfort when walking on certain surfaces. If you find pockets of dirt or debris during the trimming process, you can carefully dig this out using a hoof pick or the pointed tip of a closed pair of hoof shears (more on this below).
In some cases, you may need to trim the heel as well, but be very careful because this area is much softer than the hoof wall. If it appears that the sole itself may need to be trimmed, this must be done carefully and is best done by an experienced hoof trimmer or a veterinarian who will be better able to determine if the sole needs trimming and how much trimming it needs. Remember to always pay attention to the angle of the hoof, using the coronary band as a reference.
An example of a trimmed sheep’s hoof.
Next, evaluate the dewclaws (two small claws protruding from the back of each leg, above the heel) and trim the tips if necessary. Some individuals may need only a minor trim of their dewclaws, while others may need quite a bit taken off. Either way, be sure to trim a little bit at a time to avoid cutting into sensitive tissue.
Both while evaluating the foot and while trimming, be sure to look for any signs of the foot issues described below. After the trimming is complete, observe the individual as they walk away. If they are showing signs of lameness or discomfort that were not present before the trim, it may be that one or more claws were trimmed too short. Be sure to watch them closely in the coming days, consulting with your veterinarian if the issue is severe or persists.
Digital Multi-Stage Walkthrough
For those looking for a more interactive way of learning about the trimming process, the following section contains five stages of a typical sheep hoof trimming experience, starting from an overgrown hoof, and how it should appear after each major milestone of trimming. You can rotate and zoom the model in each stage to get a better sense of what you may be looking at from various angles!
Common Diseases Of The Foot
Sheep can develop various foot issues that, without proper interventions, can reduce their mobility and negatively impact their quality of life. Be sure to contact your veterinarian if you suspect any of the following issues.
Infectious Foot Rot (Contagious Hoof Rot)
Infectious foot rot (sometimes spelled “footrot” or used interchangeably with the term “hoof rot”) is a bacterial infection that affects both sheep and goats but tends to be more severe in sheep. Though there are often multiple bacteria involved, Dichelobacter nodosus (formerly Bacteroides nodosus) must be present to be considered true foot rot. The other bacteria most often associated with foot rot, but which in the absence of D. nodosus does not cause true foot rot, is Fusobacterium necrophorum. On its own, F.necrophorum causes interdigital dermatitis (described below) but can make the foot vulnerable to infection with D. nodosus. There are numerous strains of D.nodosus with varying degrees of virulence. Some countries, such as Australia, categorize infectious foot rot as benign or virulent based on the strain, but this is less common in other parts of the world, including in the US.
Foot rot typically occurs in areas with periods of warm, wet weather – with spring and fall being the common times for transmission. In addition to wet conditions, overgrown hooves can also make foot rot infections more likely. Some breeds of sheep, such as Merinos, are more susceptible to foot rot than other breeds. Sheep with foot rot contaminate the environment with D. nodosus which can then infect other residents. D. nodosus can only survive for between a few days and a few weeks in the environment, but infected sheep can be carriers for years.
Differentiating between benign foot rot and interdigital dermatitis is difficult, and people sometimes refer to both as “foot scald.” Affected individuals often have rot in more than one foot, and both claws are usually affected. In benign cases, sheep will develop inflammation and necrosis of the tissue between their claws and mild lameness. Benign foot rot typically only affects a few individuals in a flock, whereas virulent strains typically affect numerous individuals. Virulent foot rot often causes severe lameness, separation of the hoof wall, a foul odor, and a black tarry appearance. Individuals with virulent strains may also develop a fever and have a reduced appetite, resulting in weight loss. Foot rot can lead to secondary bacterial infections and fly strike.
If you suspect a resident has foot rot, be sure to get your veterinarian out to examine the individual(s). Foot rot is usually diagnosed based on clinical signs, though, as mentioned above, benign strains may be difficult to differentiate from interdigital dermatitis. Treatment typically involves trimming of the hoof, application of a topical antibiotic treatment (tetracycline is a common one) or medicated foot baths and possibly systemic antibiotics. Please note – there is conflicting information regarding whether or not hoof trimming assists in the healing process or not. Be sure to work with your veterinarian for specific recommendations. Depending on the situation, they may also recommend fully isolating the affected individual or taking measures to prevent exposing other groups of sheep and goats to the bacteria. In severe cases, you may be advised to remove all sheep and goats from certain living spaces temporarily in order to prevent reinfection. Prevention is key – be sure to regularly trim your residents’ hooves, keep indoor living spaces dry and clean, and make sure outdoor areas have adequate drainage.
Interdigital Dermatitis (Foot Scald)
As explained above, interdigital dermatitis is caused by the bacteria Fusobacterium necrophorum, and often occurs in warm, wet conditions. If the foot is exposed to wet conditions for prolonged periods of time, it can become vulnerable to damage, especially between the claws, which allows bacteria to enter. Individuals with interdigital dermatitis will have inflammation of the tissue between the claws, and the skin may be discolored, moist, raw, and sensitive. Sheep with interdigital dermatitis usually develop only mild lameness. Individuals with this condition are vulnerable to infectious foot rot.
Treatment typically involves limiting the individual’s exposure to wet areas and a topical treatment of zinc sulfate. In some cases, trimming the hair/wool around the hoof can help the foot to dry out more quickly. Though sometimes recommended as a treatment, copper sulfate should be avoided due to the possibility of copper toxicity if ingested.
Laminitis
Laminitis, inflammation of the soft tissues of the hoof, is a painful condition that, while more common in equines, can also affect sheep. Laminitis is often associated with diet – sudden access to or overconsumption of concentrates or lush forages; a diet high in protein; or a diet high in grain and low in roughage could predispose a sheep to laminitis. Certain illnesses, such as pneumonia, mastitis, and metritis, can also play a role in the development of laminitis.
Signs of laminitis include lameness, a stiff gait, feet that are noticeably hot, and pain and sensitivity at the coronary band. You may hear the individual grinding their teeth due to pain, and they may develop a fever. Sometimes only the front feet are affected, but in more severe cases, all four feet are affected. Without treatment, laminitis can become a chronic condition resulting in changes in the shape of their claws and a difference in height between the inner and outer claws. In chronic cases, knee walking is common and hoof material is often very hard, making it difficult to trim.
Be sure to work with your veterinarian if you suspect one of your residents has laminitis. In acute cases, in addition to analgesics (typically an NSAID), it’s important to also identify the underlying cause (and correct/treat it if possible). In chronic cases, frequent, aggressive hoof trimming will be necessary. Your veterinarian can guide you in how often and how aggressively to trim their feet. While not all laminitis is associated with dietary issues, ensuring your residents are on a proper diet and avoiding sudden changes to their diet is helpful in preventing laminitis as well as a host of other health issues. If someone needs supplemental grain, be sure to introduce this slowly.
Foot Abscesses
Sheep can develop abscesses in their feet, affecting either the heel or the toe. Whereas the conditions listed above often affect more than one foot, foot abscesses may only affect one claw. While not the only possible cause, individuals may develop a foot abscess following trauma to the foot such as from stepping on something sharp or from improper hoof trimming.
Signs of a foot abscess include swelling of the affected claw and swelling at the coronary band, heat, and acute lameness with the individual often reluctant to bear weight on the affected claw. If the abscess has ruptured, you may note discharge coming from a draining tract. In cases where the abscess has not yet ruptured, your veterinarian may open it up while trimming the hoof, or they may lance the swollen area. Be sure to consult with your veterinarian regarding treatment, which may include analgesics and antibiotics (systemically or flushed into an open abscess) and bandages or blocks to protect the affected claw. If foot abscesses are a common occurrence, work with your veterinarian to identify possible causes so you can work to address them.
Troubleshooting
Below are some other issues you may encounter during the hoof trimming process. When in doubt, always contact your veterinarian for guidance.
If You Draw Blood
If you “quick” a claw (cut into the blood supply), what you do next will depend on the severity of the wound and bleeding. Minor wounds can typically be treated with a blood-stop product like a styptic pencil or styptic powder (such as Quick Stop). You can also coat the wound in cornstarch or flour to encourage natural clotting. When applying powder products, it may help to also apply some pressure to the area. If the bleeding is more severe, or if you find the above method is not effective, the claw may need to be wrapped temporarily. You’ll want to avoid allowing the individual access to wet areas while wrapped because a wet, soiled wrap could cause additional issues. We recommend contacting your veterinarian if you are unable to get the bleeding to stop with a blood-stop product, if the individual is severely lame, or if an individual continues to be lame a few days after being quicked. Also be sure to contact your veterinarian immediately if the individual is not up-to-date on their tetanus vaccine (part of the CDT vaccine).
If The Hoof Is Very Overgrown Or Misshapen
If their hooves are significantly overgrown due to a lack of hoof maintenance, such as in the event of a newly rescued individual, you may need to spread trimming out over a couple sessions. During the first trimming you can work to bring each claw closer to a reasonable length and shape, and then come back a few days or a week later to do the finishing touches. If you find that a resident’s hooves tend to become very overgrown between their scheduled hoof trimmings, be sure to trim them more frequently. If you encounter someone whose hooves are significantly overgrown or misshapen and you are unsure of how to address them, be sure to consult with your veterinarian for assistance.
If A Resident Has A Deep Pocket Of Packed Dirt Or Debris
Frosty has a pocket of packed dirt that needs addressed. Photo: @fantathelamb
Unfortunately, it is not uncommon to come across a sheep who has separation between the sole and hoof wall (this is known as white line disease or white line separation and is sometimes referred to as “shelly hoof”). These pockets can get packed with dirt, feces, pebbles, and other debris which can lead to other hoof issues. Debris should be picked out (using a hoof pick or the tip of your trimmers). In some cases, you will be able to open up or even trim out the entire pocket, but in more extreme instances, the pocket could be very deep. Work with your veterinarian or other experienced hoof trimmer to determine just how much to trim, as you don’t want to expose sensitive tissue, but you also want to take steps to prevent future issues. In some cases, regularly picking the area and then cleaning it may be warranted.
If You Trimmed Someone’s Hooves Very Unevenly
If you happen to do a very poor job leveling out someone’s hooves to the extent that it affects their mobility, contact your veterinarian for an evaluation. They can guide you in correcting the issue and, if needed, can also review proper hoof trimming techniques with you to avoid future issues.
Hoof health plays an important role in a sheep’s overall health and well-being, so be sure to take hoof care seriously! Neglecting to trim a resident’s hooves before they become seriously overgrown can predispose them to various foot issues, so regular hoof evaluation and trimming is key. Be sure to learn proper technique – remember, improper trimming can cause issues that could have been avoided. Poor nutrition can also negatively affect hoof health, so make sure your residents are fed a healthy diet that meets all their nutritional needs.
Non-Compassionate Source? If a source includes the (Non-Compassionate Source) tag, it means that we do not endorse that particular source’s views about animals, even if some of their insights are valuable from a care perspective. See a more detailed explanation here.