


This resource was updated as part of the veterinary review process. It was originally published on March 29, 2018.
Much like the common advice given to humans, it’s important to regularly check the health of turkeysUnless explicitly mentioned, we are referring to domesticated turkey breeds, not wild turkeys, who may have unique needs not covered by this resource. with a routine health checkThe Open Sanctuary Project uses the term "health check" to describe health evaluations performed by caregivers who are not licensed veterinarians. While regular health checks are an important part of animal care, they are not meant to be a replacement for a physical exam performed by a licensed veterinarian. rather than waiting until a bird is showing signs of distress or illness. Not only will this help you get to know what a healthy turkeyUnless explicitly mentioned, we are referring to domesticated turkey breeds, not wild turkeys, who may have unique needs not covered by this resource. looks and feels like, but regular handling may help in keeping individuals calm in more stressful situations. Be prepared to check turkeys over at least once every six to eight weeks*! For more information on why regular health checks are important, check out our resource here.
Supplies
Before conducting a health check, it’s helpful to gather any supplies you may need and have them arranged nearby for easy access. Having everything you will likely need nearby can make the process go more smoothly and can reduce the amount of time the turkey needs to be restrained. If you are performing a health check on someone with a known health issue, such as bumblefoot, you may need other supplies, like those needed to wrap a foot. Otherwise, supplies to have on hand during turkey health checks include:
- Recordkeeping supplies
- Nail trimmers and/or dremel tool
- Styptic powder or other blood stop product
- Gauze squares (non-sterile is typically fine, but there may be times when sterile gauze is necessary)
- Exam gloves
- Bandage scissors
- Turkey-safe topical disinfectant (such as dilute chlorhexidine or dilute betadine)
- Saline flush
- Turkey-safe ointments or creams such as a triple antibiotic ointment or silver sulfadiazine cream 1% (SSD)
- Cotton-tipped applicators
- Tweezers
- Scale
- Headlamp, penlight, or flashlight
- Towels
- Antiparasitic treatment for external parasites, per your veterinarian’s recommendations
Conducting The Health Check
Before beginning individual health checks (and, if possible, before entering your residents’ living spaceThe indoor or outdoor area where an animal resident lives, eats, and rests.), it’s a good idea to take a few minutes to observe the group. This allows you to observe group dynamics and to observe each individual without restraining them. Make note of their behavior, activity level, and general appearance. If residents are up, observe how they are standing and moving. This is also a good time to observe everyone’s breathing, looking to see if anyone is open-mouth breathing. If temperatures are hot, the entire flock may be slightly open-mouth breathing (severe open-mouth breathing is a sign of overheating and immediate steps should be taken to provide residents relief from the heat). However, in addition to being a response to being hot, individuals may open-mouth breathe if they are sick or in pain. If you note open-mouth breathing when temperatures are cool, or if you notice that only one resident is open-mouth breathing or is open-mouth breathing more severely than others, this warrants closer observation (and in some cases, an immediate call to your veterinarian).
In addition to paying attention to your residents’ mobility and breathing, during this general observation of the group, watch for anyone who stands out as looking or acting differently from the rest of the flock. While this may not necessarily be an indication of a health concern, it certainly calls for further observation and consideration during the health check. You can read more about “normal” versus potentially concerning turkey resident observations here.
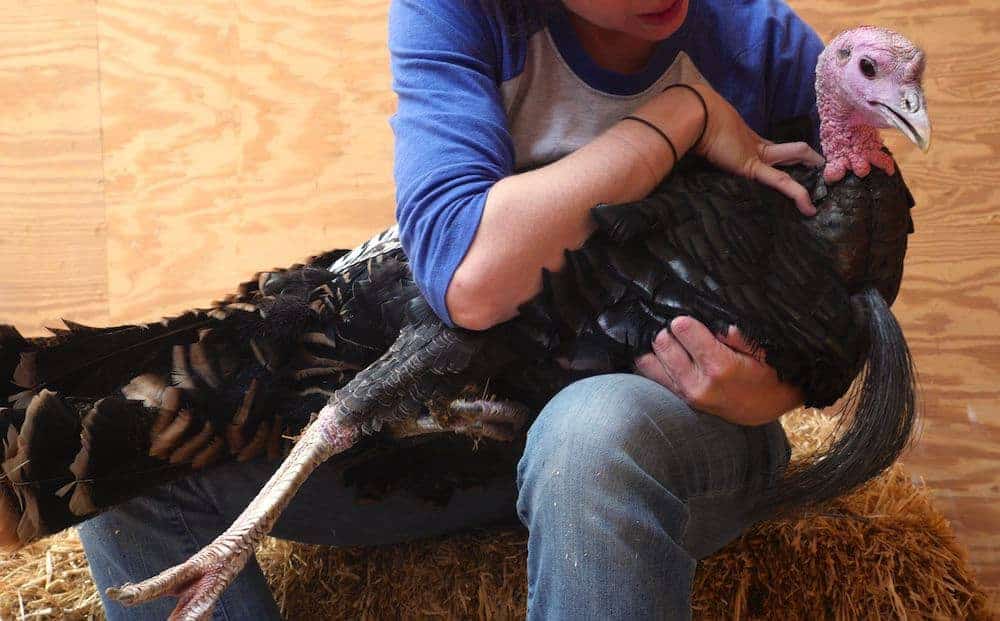
During regularly scheduled health checks, your goal is to check every inch of the turkey. Some folks like to start at their head, while others may prefer to start at their feet. Either is fine, but it’s helpful to have a general order and routine that you follow each time because this can help ensure you do not miss a step. However, because some areas naturally flow into others, it might not be helpful to think of the process as a linear list of areas to check. Instead, we think of it more as a choreographed routine, where checking one area flows into checking another area. By checking individual areas or body parts in isolation, you may miss important findings in the gray areas in between. While performing the health check, it’s imperative that you continually monitor how the turkey is doing by watching their breathing and their color and taking a break if they appear overly stressed.
Up next, we’ll go over important components of a turkey health check:
In cold climates, red and swollen toe tips, blackened skin, or hard black scabby toe tips could be a sign of frostbite. If you suspect frostbite, be sure to move the turkey into a warmer area and consult with your veterinarian. At the very least, the turkey will likely require pain medications, but may need antibiotics, or even surgical intervention, depending on the extent of the damage. If a turkey shows signs of frostbite, be sure to make changes to their living space to protect the rest of your residents.
While bulges on the top of the foot, in between the toes, could be a sign of infection, they could also be the result of dirt or mud packed into foot crevices, which is not an uncommon occurrence in large breed turkeys. If you find a resident with a lump in this area, you can start by applying very light pressure to the skin on the top of their foot while watching the bottom of the foot, which should allow you to determine if the cause of the lump is mud pack or not. Remove any mud that has become trapped in this crevice with gentle pressure and the use of wet gauze or cotton-tipped applicators. Be very careful not to damage the skin while attempting to clean this area.
Make sure that the turkey’s toes are elongated and straight; twisted and folded toes are generally not a good sign, but you’ll need to familiarize yourself with what is normal for each individual. Some turkeys may come in with bent toes when they are rescued, possibly from an old injury, and may never have issues or need any treatment, but if a turkey had straight toes last month and twisted toes this month, then you should consult with a veterinarian. Additionally, keep in mind that some turkeys may arrive missing their nails and toes tips due to the cruel practice of detoeing.
The turkey should have smooth, flat scales on their feet. Raised scales could be a sign of scaly leg mites, though sometimes older individuals develop slightly raised scales where their foot and the front of their leg meet.
You can check a turkey’s natural perching reflex on both feet by placing a finger under their foot and allowing the turkey to grasp it with their toes. Additionally, or alternatively, you can gently flex and extend their hock1: the tarsal joint or region in the hind limb of a digitigrade quadruped (such as the horse) corresponding to the human ankle but elevated and bending backward 2: a joint of a fowl's leg that corresponds to the hock of a quadruped. Their toes should curl (as if gripping around a perch) when the hock is bent and should straighten when the hock is extended.
Check their nails to ensure that they’re normal length. You may have to trim or file them if overgrown.
Check for any signs of irritation on the hock, which could be the beginning of a pressure sore. This is especially common in large breed turkeys who spend large amounts of time lying down due to mobility issues or obesity. These individuals may benefit from more frequent checking of their hocks. Early detection, when skin is irritated but not yet wounded, is imperative because once pressure sores develop, they are difficult to address and can lead to infection. In addition to working with a veterinarian to determine the cause and best course of action to address sores, environmental changes should be made to prevent hock sores from worsening. This includes providing softer, cushioned surfaces and/or adding more bedding to the areas where they spend time lying down.
Carefully check their range of motion, especially in their hocks, and check for crepitus (creaking, cracking, crunching, popping, or grating), pain, resistance, heat, or swelling. Stop your evaluation and contact a veterinarian immediately if you feel a large amount of crepitus with pain – this could indicate a fracture and could be made worse with ongoing manipulation. Because of the conformation of their legs, assessing range of motion issues in their knees and hips is difficult. Hot, swollen, or scabby joints could be a sign of infection. Consult with your veterinarian immediately. Never attempt to drain infected joints!
If the turkey has a leg band, be sure to check that it fits properly and is not causing any issues.
Ensure that there are no mites, lice, or other parasites in this area. Check for wounds, especially rat wounds, as this is where they tend to bite; the presence of rat wounds is a major red flag that you must take immediate steps to control your rodent population and protect your residents before they cause more damage. Read more about compassionate ways to respond to rodent-related issues here. You may need to move turkeys to a new, predator-proof location for the time being in order to keep them safe.
Make sure the vent isn’t irritated or prolapsed. If you notice that a turkey you are restraining is prolapsing, set them down immediately. If there is just a small amount of prolapsed tissue, it may go back in once the turkey is set down, with no intervention on your part. If this is not the case, or if there is more than just a very small amount of tissue prolapsed or if the prolapsed tissue appears unhealthy, contact your veterinarian for guidance. Not only can they help with addressing the prolapsed tissue, they can also perform diagnostics to determine the cause of the prolapsethe falling down or slipping of a body part from its usual position or relations. Be aware that other bird residents will likely peck at a flock mate’s prolapsed tissue (especially if there is any sign of blood in the area), causing damage, so a turkey with a prolapsed vent should be kept away from other birds. Additionally, a prolapsed vent is a site where fly strike might occur, so it’s a good idea to regularly clean the area with saline and keep the individual in a clean and dry environment until a veterinarian assesses them. However, it is imperative that you do not pick up the turkey, as this could cause them to strain and prolapse further. A prolapsing turkey should be moved using a carrier or other device that allows you to move them without restraint and without putting pressure on their body. If a large amount of tissue is prolapsed, KY Jelly can be applied to the tissue to help keep it lubricated and potentially viable during the time it takes to transport them to the veterinarian. Read more about how to handle a prolapsed vent here.
Anyone with feces-covered feathers should be cleaned and/or have the dirty feathers trimmed using blunt-tipped scissors. This must be done carefully to ensure you do not accidentally cut their skin. Avoid trimming any feathers that appear blue where they are exiting the skin, as these are likely newly emerging pin feathers that have a blood supply, and trimming them could cause bleeding at the site of trimming. Be sure to contact your veterinarian if anyone has excessive fecal matting, diarrhea, or is showing other signs of concern.
An enlarged preen glanda large gland that occurs in most birds, opens dorsally at the base of the tail feathers, and usually secretes an oily fluid which the bird uses in preening their feathers (also known as an oil gland or uropygial gland) could indicate impaction or cancer. Impaction can often be handled with a warm compress periodically applied to their preen gland, but you should have a veterinarian examine the individual before beginning treatment. Using pressure to express a preen gland that appears large can result in damage – this is a technique that should be demonstrated to you and should only be used when a veterinarian has confirmed that the cause of the enlargement is indeed an impaction and not something else.
The turkey’s wings should be checked for cuts, swelling, scabs, and other injuries. If their wing tips are scabby or beat up, this could indicate that they have a mobility issue and are using their wings for balance and support. Make sure to also check the area underneath their wings for lice, mites, bruising, or injury.
Males, as well as some females, have a bristly beard protruding from their chest. In males, these can be quite long, resembling a horse’s tail. In females, the beard may be so short that it isn’t visible through their feathers, or it may protrude only slightly.
Check along the keel for any sores. Keel sores should be treated early on, before they risk infection, and you should investigate the cause. It may be that they need thicker bedding in the areas where they rest, or it may be that they are lying down more often due to arthritis or another health issue that requires veterinary assessment and pain management.
If a turkey is laying eggs and crushing them while nesting, you must be diligent about keeping them clean, as egg material will attract flies, which can lead to flystrike.
If the crop is hard or filled with fluid, this could indicate a problem. In general, it is best to assess the turkey’s overall well-being in addition to any perceived crop abnormalities. A turkey could have a hard crop because they overate or didn’t drink enough water on a hot day. They could have a fluidy crop because they just drank a bit of water. If the turkey is bright and active and doesn’t have a major abnormality, you can usually plan to check their crop later in the day and, if necessary, again in the morning before they have eaten. If their crop is flat by morning, then most likely either there was never really an issue to begin with or the issue was minor and resolved on its own. If the abnormality does not resolve, becomes more severe, or the turkey begins to display other signs of illness, then you should consult with a veterinarian to diagnose and treat the issue.
Be very careful handling a turkey with a large fluid-filled crop, as they can easily regurgitate and then aspirate (inhale the regurgitated fluid into their airways). If the turkey has foul or sour-smelling breath, this also indicates possible crop issues, such as sour crop, which is a fungal yeast infection that requires treatment. If the crop remains full and firm and they haven’t eaten in a while (or overnight), the crop could be impacted (or blocked).
NEVER attempt to empty a turkey’s crop by cutting into the crop or forcing them to regurgitate. These are not safe or appropriate practices. Emptying the crop using a feeding tube and syringe should only be done by a professional or highly trained turkey caregiver, and the turkey’s crop must first be evaluated to determine if the contents can be removed in this manner. In some cases, surgery is necessary. All surgical interventions must be done by a licensed veterinarian using proper analgesics and anesthetics. Discuss all crop issues and treatments with your veterinarian – it’s important to determine the underlying cause of the crop issue which often requires a culture and possibly diagnostic imaging.
Scabs or other lesions on the head or neck could be a sign of illness or injury.
Neck – Observe the position of their head. Any head tilting should be noted. The individual should be able to hold their neck upright, extending vertically from their body. Drooping could be a sign of illness and holding their neck so their head is facing upwards could be a sign of a neurological issue (this position is often referred to as “star gazing”). In addition to caruncles, turkeys have a single wattlea fleshy pendulous process usually about the head or neck (as of a bird) that is quite different from those of a chicken. Compared to a chicken’s wattles, a turkey’s wattle is less fleshy and more connected to their neck (almost like a sail).
Snood – The snood is the fleshy growth above the beak. Be aware that some agricultural settings remove turkeys’ snoods. In females, the snood is fairly small, but in males it changes size depending on what the turkey is doing – lengthening and hanging down when they are strutting, and becoming quite short and even standing upright at other times. The snood should be supple and free of lesions. Swelling, scabbing, or abnormal discoloration are signs of concern.
Ears – Their ears are round openings located behind their eyes. Feathers covering/bordering the ear should be clean, and the canal should be free of discharge, debris, or strong odor.
Eyes – The turkey should have wide open, clean, alert eyes. They should be clear and free of discharge. Cloudy, watery, dry, swollen, or crusty eyes could indicate illness or injury. Their pupils should be round, be about the same size, and react properly to bright light (get smaller and then return to normal). A cloudy eye could be a cataract or the result of an infection. Turkeys have a third eyelid (also known as the nictitating membranea thin membrane found in many vertebrates at the inner angle or beneath the lower lid of the eye and capable of extending across the eyeball). It should be cloudy white and retract when stimulated, rather than red, swollen, or non-retractable. You should have your veterinarian evaluate any eye abnormalities as soon as possible.
Sinuses – Check the area around the eyes and in front of the eyes for any swelling. Sinus infections are not uncommon in turkeys and present as swelling around the eyes and above the beak.
Beak – Their beak should be smooth and free of cracks. However, turkeys may arrive missing a portion of their upper (and possibly lower) beak due to the cruel practice of debeaking. In individuals who have full beaks, check the length of the top beak. If it begins to grow much longer than their lower beak, you may need to trim or file it down. If the upper beak is allowed to grow too much, it can interfere with eating, pecking, and preening. Check the alignment of their upper mandible (top part of their beak). It should be directly above the bottom part and, unless they have been debeaked, should be slightly longer, usually coming to a point. If the top and bottom beak go in different directions, this is referred to as “scissor beak” or “cross beak” and is often the result of a congenital issue. Turkeys with a crossed beak may need to be offered softer foods (such as soaked pellets) in a wide shallow bowl, because dry pellets and crumble can be difficult for them to eat. They also tend to need their beaks trimmed regularly, and, depending on the severity, may need either or both their upper and lower beaks trimmed. If you notice that a turkey’s beak alignment is suddenly different, consult with your veterinarian.
Nareseither of the pair of openings of the nose or nasal cavity – There shouldn’t be any discharge or crustiness in their nares. If the nares appear clogged at all, you can use a moistened cotton-tipped applicator or a pair of tweezers to gently remove any obstruction. Their breathing should not be labored, loud, wheezy, rattly, whistling, or squeaky.
It’s completely normal for their mouth’s roof and upper mandible to have a split in it. This is the choanal slit, and it should be free of obstruction and discharge. Their breath shouldn’t have an overly strong odor – a sour smell could be a sign of sour crop. At the center of the back of their throat, you will see the glottis (opening to the trachea) and depending on the lighting and the angle from which you are looking, you may also be able to see partially down their trachea. If you have a concern about the trachea, in addition to consulting with your veterinarian, you can hold a light against a turkey’s neck while looking down their throat. The light will illuminate their trachea, allowing you to see more clearly for any signs of obstruction, gapeworms, lesions, or other concerns.
Part the turkey’s feathers around their body, being mindful of any pin feathers (new feathers), as these emerging feathers are very sensitive to handling and can be damaged easily. Feathers can hide skin illnesses and injuries. This is the time to ensure you are checking and feeling every area of the individual’s body, not just those highlighted above. This thorough portion of the health check is critical to ensure that nothing that can be addressed early is missed. Their skin should be soft, pale pink, and translucent. Look for areas of abnormal discoloration, scabbing, swelling, and any signs of injury. Look carefully for signs of external parasites, including clumps of eggs or irritated, scabby skin.
To weigh turkey residents, it can be helpful to use a scale intended for “dynamic weighing” or “weighing in motion,” as these scales will calculate the average weight for an animal moving around on the scale rather than oscillating indefinitely. Make sure the turkey has adequate traction on the scale (a bath mat or rubber bowl can be used to provide traction) and keep your hands near them to prevent them from slipping or jumping off the scale, which could result in injury. We recommend weighing turkeys in a standing or sitting position rather than placing them on their side. We never recommend placing a turkey on their back.
In addition to weighing each individual, you should also pay close attention to their body condition to determine if they are at a healthy weight. A prominent keel is a sign an individual is underweight. In an individual who is overweight, the keel may be difficult to feel and the individual may stand with splayed legs and tip forward rather than standing upright.
When in doubt, grab a fecal sample and connect with your veterinarian.
To read more about considering alternative living arrangements in response to a health condition, check out our resource here.
Though it may seem like an overwhelming amount of factors to be aware of, once you’ve gotten to know a turkey and what good turkey health looks like, you’ll be an excellent turkey health ally in no time!
Writing It All Down
As you may know, regular documentation is a critical part of responsible sanctuary animal care. In order to maximize the value of your turkey health checks, we’ve developed a free printable turkey health check form for sanctuaries and rescues!
SOURCES:
Physical Examination Of Backyard Poultry | Merck Veterinary Manual
Fluke Infections In Poultry | Merck Veterinary Manual
BSAVA Manual Of Backyard Poultry Medicine And Surgery (Non-Compassionate Source)


